Showing posts with label luna sol. Show all posts

Tula Nova Quilt & Tips for Machine Appliqueing EPP Giants

Monday, July 3, 2017


When I was picking thread colors to quilt projects for my new collection, Caturday, I discovered a happy accident. Lots of the thread colors from my Luna Sol Aurifil thread set were great matches for Caturday! When I dumped all the new rolls of fabric into my storage pin, it clicked. The two collections blend together almost seamlessly to create a bright and happy color spectrum! Awww yiss. 

I pre-ordered the Tula Nova EPP kit from Paper Pieces while at Quilt Market in St. Louis, and received it in early June, eager to get started. Time for a Luna Sol and Caturday mashup of legendary greatness! I spent some time studying the original quilt and mimicked the color placement in my coloring sheet, taking notes on which prints I planned to use. The ring of striped pentagons dug its claws in my brain and I had to replicate it. Thankfully, my buddy Rebecca Bryan's new collection Panache had four stripe prints that were perfect colors for this project. I had to improvise for the yellow stripe by piecing the fabric myself from Kona Buttercup and Yarrow. For the diamonds on the outermost pentagons, I used a selection of Windham Artisan cottons and a few other random Kona shades.


Once the whole thing was pieced, I had to figure out how to applique this giant onto the background. The pattern suggests basting it before appliqueing, but doesn't get more detailed than that. I put on my thinking cap and came up with a solution that worked insanely well. I've detailed my process below. Take note however, I thread basted all of pieces. If you're a glue baster, this approach won't work quite the same.

  1. Remove all the paper pieces except for those along the outermost edge. Press the entire EPP monster with a hot iron and spray starch until it is entirely flat and smooth. Give the outermost edges an extra press.
  2. Lay out background fabric and tape to the ground as if basting a quilt sandwich, making sure it's smooth and taut. Lay applique on top, position as desired, and smooth it out. Pin baste, starting at the center and working out radially. Do not basted the outermost edge because these pieces still have paper in them. Instead, pin as close to them as you can on the pieces without paper. Your outermost edge will be unbasted.
  3. Select a thread to match your applique (I used Aurifil monofilament on top) and set your machine to a blanket stitch.
  4. Remove the thread basting on a small section of the outermost edge and remove the paper pieces. I worked "block" (the star-in-pentagon units or fat star units) by block. With the papers removed from one block, pin the loose outer edge down with a straight pin or two. Begin stitching the applique down with the blanket stitch. When you reach any dog ears/seam allowances that stick out, simply fold them under the applique. I used my Purple Thang for this or a pair of tweezers for stubborn dog ears.
  5. Proceed around the entire piece, removing basting and papers from the next block just before you reach it, pinning it as needed, and stitching. 

For the quilting, I mimicked the original quilt for the most part, making some minor changes here and there. I'm pretty impressed with how well it came out, considering I do this on a domestic machine. I can't wait to hang this up on the wall whenever we move into our own place!

Name: Luna Nova
Size: 58" square
Fabric: Luna Sol, Caturday, Panache (stripes), and assorted solids
Pattern: Tula Nova
Quilting: Custom (Aurifil monofilament)
Completed: June 28, 2017

Caturday is set to ship to stores in October 2017. I haven't done a recap/introduction post for the collection yet because I plan to do that closer to release time, so stay tuned!

Satellite Medallion Fabric Key

Wednesday, October 26, 2016


Earlier this month, issue 40 of Love Patchwork & Quilting magazine went on sale in the UK with my Satellite Medallion on the cover! This is my first time being published in a magazine, so being on the cover of my favorite quilt mag is extra surreal. 

Someone on Instagram asked for a quick visual fabric key for the pattern (prints are listed as Fabrics A-N) and I'm happy to oblige for those who want to duplicate this quilt! I've added the corresponding letters to the swatch photo below. The only fabric not pictured is Fabric I, a coordinating Artisan Cotton (40171 Red-Royal) from Windham. I believe it's listed as "Blue Red" on Hawthrone Threads. It's a lovely cross-weave with an iridescent quality, so I highly suggest using it instead of substituting a traditional solid. 


Luna Sol Blog Hop

Friday, September 23, 2016

It's the final day of the Luna Sol blog hop, and I'm going to finish it off Oprah style. YOU GET A FREE PATTERN! AND YOU GET A FREE PATTERN! FREE PATTERNS FOR EVERYONE!

To keep everything neat, I've separated the projects into individual posts / links, so click the big bold links to get each freebie. If you'd like to read more about the inspiration behind Luna Sol and see more projects, check out this post.


With the moon motif playing such a big role in Luna Sol, a round bag was an easy design choice. I adapted my Owl Carry It Bag pattern with a simple appliqued silhouette of the bunny sitting on the crescent moon, the same image from my selvedge!

The Phased quilt uses the the Luna colorway and the Sizzix Drunkard's Path dies for a modern interpretation of moon phases. The whole and half circles may look randomly scattered, but this quilt is actually comprised of one block, repeated nine times.


Thank you so much for following the Luna Sol blog hop. As a special thanks, we have an extra special giveaway with three prizes!
  1. Fat quarter bundle of Luna Sol
  2. Large Luna Sol Aurifil thread set
  3. Small Luna Sol Aurifil thread set


To win, leave a comment with your email address! I'll pick three random winners on September 28th and contact the winners. 

In case you missed the previous posts in the blog hop, here's the schedule and participants:

Sept. 19 - Fabric Mutt
Sept. 20th - Bryan House Quilts
Sept. 21st - Stars & Sunshine
Sept. 22nd - Modern Sewciety
Sept. 23rd - Sew Scatterbrained

Celestial Bunnies Applique Pattern


I love machine applique for quick and cute representational projects. To make the moon bunny mini quilt you will need:
  • (1) 24" square for background
  • (4) 7.25" x 4.5" pieces for bunnies
  • (2) 6.5" squares for moon background and crescent
  • (8) 1.75" squares for sparkles
  • (12) 1" squares for circles
  • Paper-backed fusible web 
  • 26" square batting
  • 26" square backing
  • .25 yard for binding
  • Thread to match your appliques (I used my coordinating Aurifil collection)
  • Applique templates, printed at 100%
Trace the appropriate number of each template onto your paper-backed fusible web. You'll need (4) bunnies, (1) moon background, (1) moon crescent, (8) sparkles, and (4) of each size of circle. Fuse the web to the wrong side of your fabric and cut the pieces out.

Fold and press your 24" background square in half vertically, horizontally, and on both diagonals to create creases. Unfold. Position your applique pieces as shown in the photo, using the creases as a guide and fuse them to the background. Stitch around each piece with a blanket, applique, or zigzag stitch with matching thread. 

Now you can make your quilt sandwich and quilt your mini! Cut (3) 2.5" WOF strips from your binding fabric, sew end to end, and bind. 

Phased Quilt Tutorial


When I began designing the quilts for my fabric line, Luna Sol, I knew I had to have something reminiscent of moon phases. Cutting lots of curved templates can be slow though, and I anticipated a time crunch. What a perfect opportunity to put the Sizzix Fabi I won at Fall Quilt Market to work! I contacted the folks at Sizzix and they sent me the Drunkard's Path Quarter Circle and Arch dies.

This is my first project using the Sizzix Fabi and I wanted to kiss the thing afterwards for making it such a speedy process.

All seam allowances are ¼". Press seams open for best results.

Materials
  • ¼ yard 41880-2 Midnight
  • ¼ yard 41881-8 Eclipse
  • ¼ yard 41881-7 Twinkle
  • ¼ yard 41879-1 Interstellar
  • ¼ yard 41878-2 Midnight
  • ¼ yard 41878-1 Interstellar
  • ¼ yard 41882-2 Midnight
  • ¼ yard 40171-12 Blue-Orchid
  • 2⅞ yards 40171-20 Aqua-White
  • 3¾ yards backing
  • ½ yard binding

Cutting

  • From each of the ¼ yard cuts, cut (9) 8” x 4½”
    • Stack and cut using the quarter circle die. You will have (18) quarter circles per print for a total of (144).
  • From the Aqua, cut
    • (9) 6½” WOF strips and subcut (72) 6½” x 5”
      • Stack and cut using the arch die for a total of (144) pieces.
    • (1) 8½” WOF strip and subcut (36) 8½” x 1”
    • (3) 1½” WOF strips and subcut (6) 1½” x 17½”
    • (6) 5” WOF strips
      • From (1) strip, subcut (2) 5” x 10” and (3) 1½” x 17½”
  • Binding  - cut (6) 2½” WOF strips

Instructions

1. Finger press all quarter circle pieces in half to find the centers. Do the same for the arch pieces. Place (1) quarter circle and (1) arch right sides together (RST), matching up the centers and ends. Pin, sew, and press. Repeat until you have (144) drunkard's path blocks.

2. Divide the blocks into (18) groups of (8) blocks, made up of one block in each of the (8) quarter circle fabrics. 

3. Sew blocks together to make (4) semi-circle units per group and press. 

4. Sew (2) semi-circle units together to make a full circle block. Make (1) full circle block per group.
Sew a 8½” x 1” Aqua strip to the straight edge of each remaining semi-circle unit and press.

5. Sew the full circle block and the (2) semi-circle units together as illustrated and press. Repeat for all groups until you have (18) of these rectangular blocks.


6. The quilt is made up of (5) A and (4) B blocks. To make an A block, lay a rectangular block so that the full circle is on the left side. Position a 1½” x 17½” Aqua strip below. Place another rectangular block below the strip with the full circle on the right side. Sew these pieces together and press.


7. To make a B block, repeat the previous step, but rotate the rectangular blocks 180 degrees so that the full circle is on the right side for the top block and on the left for the bottom block.

8. Arrange the blocks as illustrated in the diagram. Rotate some blocks as indicated by the rotated letters on the diagram. Sew the blocks together to make (3) rows of (3) blocks each and press. Sew the rows together and press.


9. Sew the (5) 5" WOF strips together end-to-end and press. Subcut (2) 51½” border strips and sew them to the left and right sides of the quilt top. Press.

10. Cut (2) 60½” border strips and sew them to the top and bottom of the quilt top. Press.

Spring 2016 Quilt Market Recap: The Luna Sol Booth

Tuesday, May 31, 2016

Now that I've had a week to refresh after Quilt Market, it's time to talk about my fabric collection, Luna Sol, and all the awesome samples that I had on display!


Luna Sol draws its inspiration from many aspects of my life and personality, but the tl;dr version is the moon bunny. The moon bunny originates from Eastern folklore, and that is how I first heard about the concept as a child. During college, the idea of the moon bunny just stuck with me for some reason, but I wasn't thinking of it in the original context anymore. The character started morphing into something I used as a personal identifier. I refer to it as my "spirit animal" sometimes for simplicity because it's a confluence of so many ideas. It embodies themes of cycles, introversion, introspection, the nature of creativity. I think watching Watership Down for the first time helped cement all of those things together in my mind. The image of the ghostly Black Rabbit of InlĂ© and the song "Bright Eyes" by Art Garfunkel had an inexplicable impact on me. 

I'm sure most of you have heard the idea about how highly creative people tend to have turbulent emotional lives. I for one, totally relate to this short comic. Back at 2015 Quilt Con, even Heather Ross admitted she can't get through the process of designing a collection without crying at least once. I've dealt with depression since I was was eleven, and I honestly think it's the reason I became such an aggressive maker and illustrator. Somewhere along the way, I stopped thinking of the episodes as an affliction. Now, instead of being knocked on my ass when a wave hits, I've learned to ride it and let it fuel my internal exploration. When I feel empty and aimless, it drives me to find what is important to me. At the very least, making a stack of quilts and filling a sketchbook gives me a feeling of accomplishment to offset the lows. I guess you could say the moon bunny is the cuddly face of this cyclical life. He does his thing on the moon in low times and then blasts off like a comet when the tide comes in. 

The name Luna Sol, embodies this cycle as well. Night to day, totally natural. It's just the way I live, and the result is bright and colorful! With all that said, let's talk about the samples! Many of my samples can be seen in my look book with relevant details (dimensions, pattern availability, etc.), so if I don't mention the nitty gritty, check there. Samples marked with a * will be free patterns. Releases will be closer to September when Luna Sol ships to stores! All samples were made by yours truly unless stated otherwise. Yay for HMQG buddies!

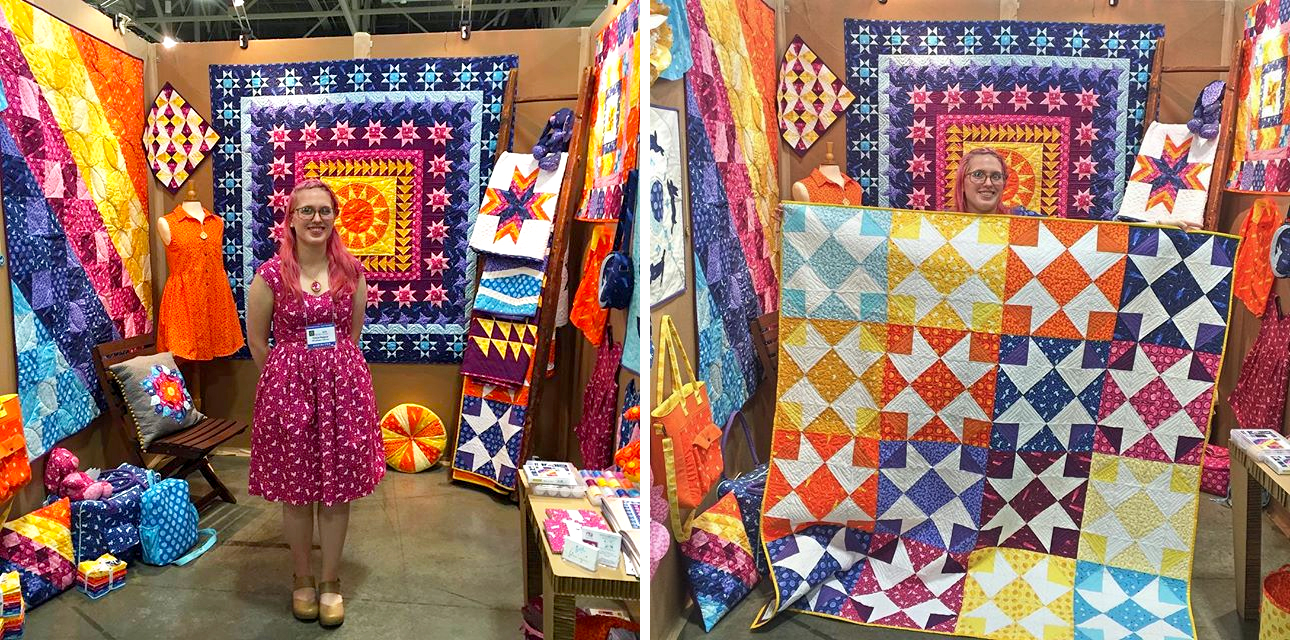
 Let's start with the left wall! We'll go clockwise from the top. The blue Mia & Moi dress was made by my friend and fellow designer, Patty Sloniger, who started me on this fabric design adventure. Next is the Northern Lights* quilt which was pieced by Cheryl Watson and designed/quilted by me. Then we have a sunny Collegiate Tote. The bunny dress pattern was a surprise find during a Hobby Lobby run, so even though I schemed to outsource all the children's garment sewing to friends with kids, I found myself making a 4T dress. Go figure. We also have my billionth cathedral window pillow cover, sans pillow. At the center is a mini quilt that was actually one of the first quilt patterns I came up with for Luna Sol.


On the floor below sat a pillow version of Northern Lights*, one of three Easter Bunny Buddies made by Liz Pawlik, the Guild Duffel (a new pattern of mine coming later this summer), and the Matsuri Bag.


Here you can see a better view of the Northern Lights quilt*, a kaleidoscope mini by Stephanie Freeman, and the centerpiece, the Satellite Medallion! This quilt pattern is featured on the cover of the look book and will be featured in an upcoming issue of Love Patchwork & Quilting magazine. I made my first Alder Shirtdress too, but it stayed on the mannequin because it ended up not being very flattering on me. Giuseppe Ribaudo (AKA @giucy_giuce) made an awesome EPP pillow complete with pom poms (tutorial here)! Julia Eigenbrodt also made a pillow featuring a leaping bunny with her FPP wizardry. She also supplied several of her adorable 3D printed embroidery hoop necklaces that we sprinkled around the booth. 

On the right wall we hung up my Phased quilt* which I made using the Drunkard's Path dies from Sizzix. The round Moon Bunny bag* hanging beside it features an applique version of the logo from my selvedge. Below that, you can see the Sweet and Sassy dress made by Katie Christman that her daughter preciously modeled in the look book. Heidi Staples made the Planetary Mini Medallion* which will be part of my blog hop closer to the release date. Hilary Jordan made the Sketchbook Shirt for her son William, who dubbed it his "fireball bunny shirt." Karri Garza also got in on the kid's sewing with a Geranium Dress!

I made a patchwork lined drawstring bag at the last minute, which hung out next to the Crimson & Clover Train Case also made by Stephanie Freeman. There were four more large quilts that we didn't have room for on the walls. From top to bottom: Feathered Stars by Rebecca Bryan, The New Wave Quilt, Sunset Star* which was pieced by Debbie Grosskopf, and Night Bunnies* by Stephanie Kendron. You can see all of those (minus the New Wave) in the look book. Lastly we have the Sprocket Pillow that you can see better in the panorama towards the top of the post.


We displayed the look books, fabric, another Easter Bunny Buddy, and my Aurifil thread collection on the cardboard table. If you haven't seen the gorgeous thread colors to coordinate with Luna Sol, you can check out the post and interview on Aurifil's blog. All of the large quilts (minus Night Bunnies and Feathered Stars) were quilted using these threads, and they were heavenly to have. It's such a relief to have the perfect colors already at your disposal.


I hope you enjoyed all the pretty Luna Sol projects! You can check out the #LunaSolFabric hashtag on Instagram to see more and keep up with what we're making with it.

Spring 2016 Quilt Market Recap: An Overview

Sunday, May 29, 2016


As usual, I'm going to break up my Market recap into a few posts. This is just going to be a basic overview. I'll talk more about my booth and other booths in separate posts.

When Seth and I were at the airport this past Wednesday, "It Feels Like the First Time" by Foreigner came on the radio. I didn't think about it at the time, but it was some serious foreshadowing! We've wrapped up my fourth Quilt Market, but this time was a whole new experience. I officially debuted by first fabric collection for Windham Fabrics, Luna Sol!

Normally, I wouldn't bother starting at the airport, but the story is just too good. After we took our seats on our plane in Phoenix (connecting flight), I noticed a woman with a distinct haircut coming down the aisle. I whispered to Seth, "I think I know who she is. I think she's a fabric designer." She either noticed my intense staring or my "World's Okayest Quilter" shirt, because she sat down next to us. She was finishing up a phone call, and when she hung up, I spotted the contact's last name on her screen. Confirmed! So I leaned over and said, "Are you Heather Bailey?" She said yes. Cue my completely non-subtle OMG face. We had a great chat, and I even spied some of her sketchbook contents when she somehow managed to draw on the bumpy plane ride.

We arrived in Salt Lake on Wednesday night so I wouldn't feel rushed for my schoolhouse on the following day. My quilty BFF Julia joined us in the wee hours of the morning. I hadn't seen her since she moved to Ohio late last year, so I'm really glad she was able to come help/hang out! I tend to have trouble making decisions when I'm anxious, so Julia took over as my personal art director when setting up my booth. It turned out way better than I imagined!


After we set up, we immediately had to take down a large chunk of my samples to head off to my schoolhouse...which shared the same time slot as Tula Pink and Alison Glass. I only had about eight people come to mine, but it sure helped ease the pressure! Plus, it seems that a lot of my favorite designers had similar experiences with their first schoolhouses, so I didn't worry about it too much.

After re-staging the booth, we helped the Windham team set up for Sample Spree, which means we were able to scope out our prey and be perfectly staged when the madness began. I managed to be pretty good this time. I picked up Printshop, Porto, and Raindrop from Cotton + Steel, Hemma from Windham, and Shibori from Moda. 

The show went on Friday, Saturday, and Sunday, during which I met many lovely shop owners and fabric lovers. I was able to take occasional breaks as well as come in early to see all the booths I wanted to see. Honestly, it was still a blur, but that comes with the territory. It was an amazing week, and I can't wait to do it again next year. ;)


FREE BLOG TEMPLATE BY DESIGNER BLOGS