The Newsstand Tote

Monday, July 27, 2015

I'm a crossbody girl at heart, but sometimes you just can't beat a roomy tote bag. My newest pattern, the Newsstand Tote, was designed to be a fresh, functional all-purpose bag with a clean profile. 


Measuring 14" H x 11" W x 4" D with two elastic side pockets, this pattern will easily hold a stack of magazines, your hand sewing projects, or plenty of diapers and snacks for the kids. I never go anywhere without a bottle of water so having a pocket that keeps my drink upright to prevent spills and leaks is invaluable. The bag features an interior slip pocket for other small items like your keys or phone.

My pattern testers were a huge help and I'm excited to share their wonderful #NewstandTote projects with you!

Tara (@taracceleste) reports that her Newsstand Tote makes an awesome diaper bag, and her fun fabric choices keep it looking youthful and bright! And can we take a minute to gawk at her awesome photos? Girl's got mad skills.


Jaclyn (@jaclynb)'s bag features a Melody Miller border print and a bright red lining. It's like the Louboutin of bags! I rarely know what to do with border prints, so Jaclyn's bag was a total lightbulb moment for me.


My "Quilt Mom", Debbie (@mumziepooh) also used a border print, a cute measuring tape by Kokka. She's got me hunting for border prints now because they look so great with this pattern!


My fellow HMQG officer, Cheryl (@texasquiltinggal) made a flirty, feminine Newsstand Tote with a lovely Amy Butler floral print. The dottie handles add a playful touch.


Anita (@daydreamsofquilts) used one of my favorite prints, Rashida Coleman-Hale's Mochi rice print canvas for a great neutral tote.


The Newsstand Tote is now available for purchase in my Craftsy shop.


Pixel Chain Quilt

Wednesday, July 15, 2015

Over the past few months, I've gained a greater appreciation for simple quilts patterns and limited color palettes. I've also been trying to come up with some fast, but cute quilt patterns for gift quilts. I designed the Pixel Chain quilt to blend those elements. Plus I need to work through my stash! 
I used all Cotton + Steel prints, mostly from the Spring 2015 collections. I recently purchased the Creative Grids Stripology ruler and it made the cutting process for this quilt a total breeze. After that, it didn't take long to chain piece all the blocks. 


I machine quilted it with diagonal lines using variegated Aurifil 50wt cotton (#4647) that incorporates blue, white, and pink. It's hard to capture the thread in photos but it made for a really cool effect.


The quilt pattern is available in my Craftsy shop for only $4 and it includes instructions and yardage for three quilt sizes: baby (40" x 40"), lap (48" x 56"), and twin (64" x 88"). This particular quilt is the lap size and it's available for purchase in my bigcartel shop

Size: 48" x 56"
Fabric: Cotton + Steel prints
Pattern: Pixel Chain
Quilting: Diagonal lines
Completed: July 8, 2015


The Special Exhibit Quilt

Monday, July 13, 2015

Earlier this year, I had the exciting opportunity to make a few projects for Spring 2015 Quilt Market. One of those projects was a baby quilt for Lizzy House's releases of Natural History, Mini Pearl Bracelets, and Butterflies. 

My quilt hanging in the Andover booth at Quilt Market

Andover sent me a selection of blue fat quarters (my requested color) from all three collections as well as one of their new Chambrays and a navy Textured Solid. I wanted to make something simple that would keep the focus on the prints rather than complex piecing. I opted for 6" rail fence blocks with 2 small "framed" fussy cut blocks and one 12" block with a double border to add interest. These feature blocks combined with the rail fence blocks reminded me of a lot of museum floor plans, which sparked the name for the quilt: Special Exhibit. 


 I machine quilted it with a square meander pattern in navy Aurifil 50 wt cotton. I actually ran out of thread halfway through and had to make an emergency run to my LQS. Thankfully, they had the color I needed! I also quilted around the the edges of the large butterfly in the 12" block with black thread to make it pop a little.
 I used the navy Andover Textured Solid for the binding, which ties everything together nicely.


The borders for the 12" block got some custom quilting with a square spiral border.


The triceratops is one of my favorite dinosaurs in the dino print, so I had to feature that cutie in one of my blocks.

Size: 36" x 36"
Fabric: Natural History, Mini Pearl Bracelets, and Butterflies by Lizzy House; Andover Chambray, Andover Textured Solids.
Pattern: "Special Exhibit" 
Quilting: Square Meander
Completed: March 2015

Never Say Never

Wednesday, July 8, 2015

When I started quilting 18 months ago, there were plenty of things I swore up and down that would never interest me. To be honest, I had even sworn I would never make a second quilt. Within two weeks, I had changed my mind. My mercurial personality has been a blessing when it comes to quilting, and it encourages me to try everything at least once. I've even become quite fond of a few things I promised I would never bother with.

Traditional Blocks

I admit it. I used to think "traditional" was a dirty, stinky word that evoked the smell of mothballs. I wanted every quilt to be revolutionary! Why go backwards? Ah, the ignorance of the newbie.

Lately, my Pinterest board has been dotted with traditional blocks, albeit with modern fabrics. Bear Paws, Pickle Dishes, kaleidoscopes, Dresdens, and even plain half-square triangles! Red Pepper Quilts is probably where this guilty pleasure began. There is nothing you can't make modern with bright, cheery prints. And there is something to be said for simplicity.


Handwork

I used to loathe handwork. I had spent my first 10 years sewing with nothing but a needle and thread, and handwork felt like baby stuff. But after a few EPP projects, I had an itch to do more. I've come to love needle turn applique. I've even sworn off machine binding (okay, maybe I shouldn't swear anything off). I don't relish the process of finding matching thread colors, but a simple hand sewing project is the closest I can get to relaxing before I get the nagging need to be productive.


Hand Quilting

My second quilt was hand quilted, but it had been a means to an end rather than something I set out to do. The queen size quilt was too much for me to handle on my machine, so my options were hand quilting or send it to a longarm quilter, which wasn't in my budget. It took 4 weeks of slow, steady stitching...far larger than I am patient for.

Since then, I hadn't hand quilted anything larger than a mini up until I was ready to quilt my Circle Lattice. Then I hand quilted BUB, which was a blast. I used to be feel the urge to finish a quilt ASAP, but I've learned to savor the time I spend with each project. Hand quilting lets all that time and love show.


Making Bags

This one is downright laughable. I can distinctly remember telling Patty that bags (and most 3D projects) seemed far too complicated for me to ever be interested in. When I changed my mind, I did ease myself into bag making rather than plunging. My first bag was uber simple: a scrappy QAYG foldover tote that was little more than a trapezoid with boxed corners. 

It didn't take long to get the swing of things. After working through a few patterns by Noodlehead and Sew Sweetness, I was able to grasp the basics of bag construction. I started studying store bought bags I owned and photos of bags I coveted. Being able to visually deconstruct a photo of a bag is so satisfying. It's the best kind of brain teaser. 


Are there any things you've said you would never try? Did you change your mind?

The Biography Bag

Monday, July 6, 2015

Today my Craftsy pattern shop gets a new addition: the Biography Bag! I designed this bag while looking for a way to incorporate a mini charm pack of Elizabeth Hartman's first fabric line, Rhoda Ruth, into a small crossbody. The bag features a large front slip pocket (a great place for some patchwork fun), a welt zipper pocket, piping, and adjustable strap.


My first two bag patterns, the Dear Watson and Matsuri bags, are great for all-day outings, but I usually like to travel light when I'm doing everyday errands. The biography bag measures 9½” H x 9½” W x 2” D, so you can easily carry your essentials along with an e-reader or a novel. I find that when I need to get up and go, it's nice to have a large front pocket to quickly tuck my book or phone into, which is why I love the front pocket so much. 

My pattern testers made some great bags that I wanted to share with you. Erica (@skynme2) made her bag with an adorable Cotton + Steel patchwork pocket. Fussy cutting really pays off here!

Jana's (@megmormel) bag features a bold floral print from Alison Glass and a bright green zipper for some extra color!


Nicole (@nf_merritts) used a combination of Cotton + Steel and Anna Maria Horner prints for her Biography Bag. She even added some lovely hand stitching to the flowers on her front pocket. 

 I hope you love these sweet little bags as much as I do!


How to Make a Quilt Backdrop for Helper-Free Photos

Thursday, July 2, 2015

While I was writing my post about my Shieldmaiden quilt, I realized I've gotten hella behind on properly photographing my quilts. My husband, Seth, is usually willing to hold up a quilt for a minute or two while I snap a few shots on my iPhone, but a DSLR shoot is a different story. I need more time to compose the shot, adjust my settings, and shoot, and Seth is understandably unenthusiastic about holding a quilt up in the Texas heat for more than a minute. There's also the issue of larger quilts, like my Patchwork City quilt (measuring 90" square), which he couldn't hold up even if he wanted to.

I started researching how to make a structure similar to a clothesline that I could use to hold my quilts up for photos. I figured PVC pipe would be the easiest option, so I did some searches for PVC pipe photography backdrops, which are similar enough. I found this tutorial via Pinterest, and used it as a guide to make my own quilt backdrop.


I used 3/4" schedule 40 PVC pipe, as Jeff recommends in his post. I also followed his instructions for the two leg bases.

My backdrop measures roughly 74" wide and 76" tall. I have a crossbar for support at 48" height, and it can also be used for photographing smaller baby quilts. I can also add 2, 12" extensions to the width to accommodate a queen size quilt, although it will extend onto the ground a bit.

My original plan was to make a backdrop that would have a second add-on unit that would extend the height and width to about 96", but when I was assembling it, it became clear that it would be WAY too tall, and might not even stand. I ended up nixing the height addition, but keeping the optional width extension.

The structure completely disassembles with little effort, thanks to the slip-on pipe fittings.

To make your own quilt backdrop, you will need:

  • (4) 10' x 3/4" Sch. 40 PVC pipes ($2.54 each @ Lowe's)
  • (6) 3/4" Sch. 40 slip-on T connectors ($.42 each)
  • (2) 3/4" Sch. 40 slip-on cross connectors ($1.79 each)
  • (10) 3/4" Sch. 40 slip-on caps ($.39 each)
You'll also need a PVC pipe cutter or some other cutting tool.

For the first two pipes, cut each into a 72" and 48" section. Cut a third pipe into (6) 18" pieces and (2) 2" pieces. Cut the last pipe into (2) 12" pieces, (2) 18" pieces, and (2) 27" pieces.

Stick one cap on the end of each 18" and 12" piece. 


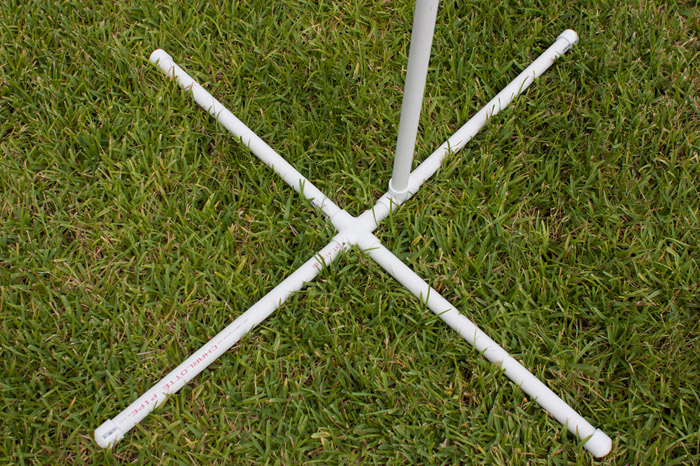
Attach (3) 18" pieces to one of the cross connectors. Join a 2" piece and an 18" piece with a T connector and attach the 2" side to the last opening on the cross connector. This is your backdrop base. Repeat to make the second base.

Stick a 48" piece of pipe into each of the open holes on your bases. Stick a T connector on top of each so the T is sideways. 

Place a 72" piece between the two legs of your backdrop and fit it into the T connectors.

Attach the 27" pieces to the top of each backdrop leg. Top each one with a T connector so that the T is oriented normally. Place another 72" piece between each leg and fit into the T connectors.

Attach the 12" pieces to the open ends of the top T connectors for additional with if desired.

With the help of some simple clamps from the hardware store, you're ready to hang your quilt!


FREE BLOG TEMPLATE BY DESIGNER BLOGS