Showing posts with label clothing. Show all posts

Fancy Tiger One Hour Top Pattern Hack

Sunday, December 11, 2016

A couple months ago I did a massive wardrobe purge after I had a mini-meltdown over what to wear to Quilt Market. I've finally outgrown Ms. Frizzle as a style icon. My new goal of dressing Lisbeth Salander from The Girl with the Dragon Tattoo mashed up with a forest witch may not be that much more grown up, but having a predominantly black and gray wardrobe makes putting an outfit together pretty painless. The problem was, after 10+ years trying to erase/avoid my cringey middle school emo phase from my memory, I had a total of 2 black tshirts in my closet.

This year I've been learning how to live happily with less, so building a capsule wardrobe of interchangable basics has become my current project. The problem is I hate clothes shopping. I was able to pick up a few staples at Goodwill and discount stores before caving in and trying Stitch Fix. It was a home run (I bought all 5 items my stylist picked), but I still needed some basic, everyday short sleeve tops. Time for DIY!


Last year, I sewed my first knit garment, the Fancy Tiger One Hour Top (free pattern here). I used this ultra simple dolman sleeve pattern as a base for my new go-to tee. A common theme in the Pinterest board I made for my Stitch Fix stylist is unusual, witchy hemlines, and I wanted to incorporate this element into my tops. Additionally, I wanted them to be tunic-length so they'd keep my bum covered when paired with leggings. These modifications took me less than five minutes to draft. Here's how you can make your own handkerchief hem / sidetail tunic:

  1. Shorten sleeves to desired length, mimicking the angle of the the original armhole hemline.
  2. Add desired length to top, 6" in my case. Add enough and you could even make a shift dress.
  3. Add a large rectangle to the bottom hemline and blend in to underarm seam. For my tops, I extended the new hemline 12" to either side, then drew perpendicular 12" lines straight up. From here, I started to draw another line parallel to the hem, and curved it upward to blend into that underarm seam. 


Repeat all your alterations on the back piece of the pattern (the only difference between the front and the back is the neckline) and you're ready to sew! The sewing process remains the same as the original One Hour Top. The only difference is your underarm seams are curved now (highlighted yellow in the image above). To finish my handkerchief hemline, I did a 3-thread overlock stitch with my serger. I did a traditional hem on my test top, but I prefer the decorative look of the serged hemline. 

As you can see, this weird rectangle becomes unrecognizable in your finished top unless you hold the hemline out. Isn't that cool?!

Including my test top, I've already made 5 of these tunics! This one is made with the most gorgeous knit fabric I've ever encountered, a tie die rayon jersey. Of all the knits I purchased, this 95% bamboo rayon / 5% spandex blend was the easiest to work with too. The raw edges don't curl much (a huge pet peeve of mine) which takes the headache out of the cutting process. It's also heavenly soft. The only downside is I think the 60" width is incorrect; it's really more like 48" wide. Good thing Fabric.com has excellent customer service though. When I contacted them about the error, they sent me another 1.5 yards free of charge. That's enough to make a few pairs of leggings! 

Spring 2016 Quilt Market Recap: The Luna Sol Booth

Tuesday, May 31, 2016

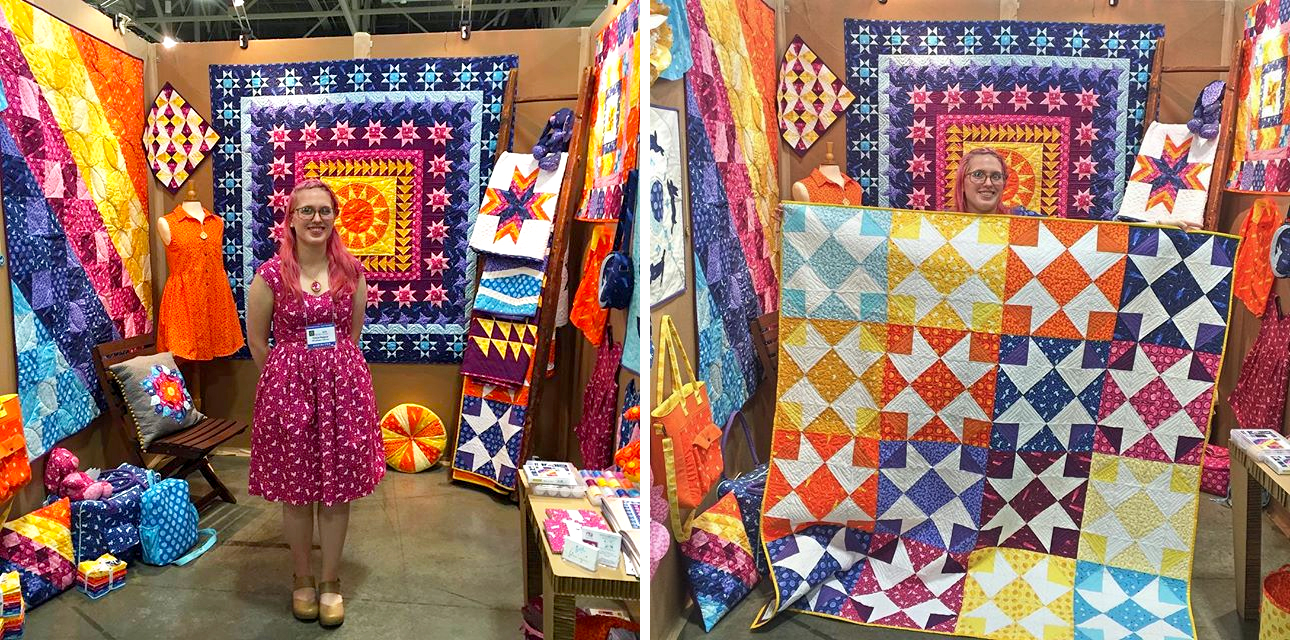
Now that I've had a week to refresh after Quilt Market, it's time to talk about my fabric collection, Luna Sol, and all the awesome samples that I had on display!


Luna Sol draws its inspiration from many aspects of my life and personality, but the tl;dr version is the moon bunny. The moon bunny originates from Eastern folklore, and that is how I first heard about the concept as a child. During college, the idea of the moon bunny just stuck with me for some reason, but I wasn't thinking of it in the original context anymore. The character started morphing into something I used as a personal identifier. I refer to it as my "spirit animal" sometimes for simplicity because it's a confluence of so many ideas. It embodies themes of cycles, introversion, introspection, the nature of creativity. I think watching Watership Down for the first time helped cement all of those things together in my mind. The image of the ghostly Black Rabbit of InlĂ© and the song "Bright Eyes" by Art Garfunkel had an inexplicable impact on me. 

I'm sure most of you have heard the idea about how highly creative people tend to have turbulent emotional lives. I for one, totally relate to this short comic. Back at 2015 Quilt Con, even Heather Ross admitted she can't get through the process of designing a collection without crying at least once. I've dealt with depression since I was was eleven, and I honestly think it's the reason I became such an aggressive maker and illustrator. Somewhere along the way, I stopped thinking of the episodes as an affliction. Now, instead of being knocked on my ass when a wave hits, I've learned to ride it and let it fuel my internal exploration. When I feel empty and aimless, it drives me to find what is important to me. At the very least, making a stack of quilts and filling a sketchbook gives me a feeling of accomplishment to offset the lows. I guess you could say the moon bunny is the cuddly face of this cyclical life. He does his thing on the moon in low times and then blasts off like a comet when the tide comes in. 

The name Luna Sol, embodies this cycle as well. Night to day, totally natural. It's just the way I live, and the result is bright and colorful! With all that said, let's talk about the samples! Many of my samples can be seen in my look book with relevant details (dimensions, pattern availability, etc.), so if I don't mention the nitty gritty, check there. Samples marked with a * will be free patterns. Releases will be closer to September when Luna Sol ships to stores! All samples were made by yours truly unless stated otherwise. Yay for HMQG buddies!


 Let's start with the left wall! We'll go clockwise from the top. The blue Mia & Moi dress was made by my friend and fellow designer, Patty Sloniger, who started me on this fabric design adventure. Next is the Northern Lights* quilt which was pieced by Cheryl Watson and designed/quilted by me. Then we have a sunny Collegiate Tote. The bunny dress pattern was a surprise find during a Hobby Lobby run, so even though I schemed to outsource all the children's garment sewing to friends with kids, I found myself making a 4T dress. Go figure. We also have my billionth cathedral window pillow cover, sans pillow. At the center is a mini quilt that was actually one of the first quilt patterns I came up with for Luna Sol.


On the floor below sat a pillow version of Northern Lights*, one of three Easter Bunny Buddies made by Liz Pawlik, the Guild Duffel (a new pattern of mine coming later this summer), and the Matsuri Bag.


Here you can see a better view of the Northern Lights quilt*, a kaleidoscope mini by Stephanie Freeman, and the centerpiece, the Satellite Medallion! This quilt pattern is featured on the cover of the look book and will be featured in an upcoming issue of Love Patchwork & Quilting magazine. I made my first Alder Shirtdress too, but it stayed on the mannequin because it ended up not being very flattering on me. Giuseppe Ribaudo (AKA @giucy_giuce) made an awesome EPP pillow complete with pom poms (tutorial here)! Julia Eigenbrodt also made a pillow featuring a leaping bunny with her FPP wizardry. She also supplied several of her adorable 3D printed embroidery hoop necklaces that we sprinkled around the booth. 

On the right wall we hung up my Phased quilt* which I made using the Drunkard's Path dies from Sizzix. The round Moon Bunny bag* hanging beside it features an applique version of the logo from my selvedge. Below that, you can see the Sweet and Sassy dress made by Katie Christman that her daughter preciously modeled in the look book. Heidi Staples made the Planetary Mini Medallion* which will be part of my blog hop closer to the release date. Hilary Jordan made the Sketchbook Shirt for her son William, who dubbed it his "fireball bunny shirt." Karri Garza also got in on the kid's sewing with a Geranium Dress!

I made a patchwork lined drawstring bag at the last minute, which hung out next to the Crimson & Clover Train Case also made by Stephanie Freeman. There were four more large quilts that we didn't have room for on the walls. From top to bottom: Feathered Stars by Rebecca Bryan, The New Wave Quilt, Sunset Star* which was pieced by Debbie Grosskopf, and Night Bunnies* by Stephanie Kendron. You can see all of those (minus the New Wave) in the look book. Lastly we have the Sprocket Pillow that you can see better in the panorama towards the top of the post.


We displayed the look books, fabric, another Easter Bunny Buddy, and my Aurifil thread collection on the cardboard table. If you haven't seen the gorgeous thread colors to coordinate with Luna Sol, you can check out the post and interview on Aurifil's blog. All of the large quilts (minus Night Bunnies and Feathered Stars) were quilted using these threads, and they were heavenly to have. It's such a relief to have the perfect colors already at your disposal.


I hope you enjoyed all the pretty Luna Sol projects! You can check out the #LunaSolFabric hashtag on Instagram to see more and keep up with what we're making with it.

3 Things I Wish I Knew When I Started Sewing Garments

Monday, March 14, 2016

1. Selecting a size isn't always a no-brainer

We know that garment patterns provide the appropriate bust, waist, and hip measurements for you to select your size, but you may be overlooking some key measurements listed further down: finished garment measurements. I consider these measurements just as important when selecting my size.

For example, lets look at the Cambie Dress. My measurements are 35" bust, 29" waist, 39" hips. According to those measurements, I would fall between an 8 and 10 for bust and waist measurements. (Since I made View B with full skirt, hip measurements don't really matter here.) But look at the finished measurements. A finished size 8  has a 37.5" bust and 30.25" waist. I'm a super petite 5' tall, so even a little too much pattern ease (that extra room in a garment that allows for movement) can ruin a garment's fit for me. I usually aim for a 36" bust and 30" waist for a fitted bodice, so I ended up tracing a size 6 for the bust and blending it into a size 8 at the waist on the bodice pieces. I cut size 6 sleeves and a size 8 skirt.

If I had gone with my initial measurements, my finished garment would have been much too big!

2. It will take you a few garments before you understand your body.

Sewing clothing for myself has opening my eyes to my body's quirks. Nowadays, when I trace a pattern, I know I will automatically need to shorten the bodice by about 1", blend in a larger waist and hip size to fit my pear shape, and maybe even take off some extra length at the hem. But I didn't learn these things overnight. It was only after making muslins for several different garments that I noticed I was making similar alterations each time. Now that I'm aware of my quirks, I can usually alter my pattern in the tracing stages and get a pretty great fit without a muslin.

3. Save your pretty Aurifil, and use polyester thread.

I usually have 50wt Aurifil Mako Cotton in my machine for quilt piecing, so early on, I just used it for sewing my clothes. The problem is that cotton thread does not provide any stretch in the way that polyester thread does. That means when I quickly pulled my Fancy Sailor Top over my head, I got a quick rip in the sleeve seam. After 3+ armpit seam rips in various garments, I made the effort to rethread my machine with some all purpose polyester thread for garment seams. If I have the perfect Aurifil shade, I might use it on hems since those don't get as much abuse. But for seams, save yourself the mending time and use poly thread.


Cambie Dress Review

Wednesday, December 23, 2015

The Cambie Dress has been on my garment sewing wishlist since I first saw it. I love the sweetly vintage look of the fit-and-flare shape with the cap sleeves and sweetheart neckline. I had been anxious about making lined dress (I always skip the lining on my Emery Dresses) but the look of Cambie was just too enticing. With this Texas winter being warmer than usual, Cambie seemed like a good option for a Cotton + Steel Christmas Dress.

The wind wasn't being very cooperative.

I did some research on what fabric to use for the lining, and decided on using imperial batiste after reading this post. I wanted something light for the Texas weather as well as inexpensive. I found some 60" wide white imperial batiste on sale from an etsy seller for $5 per yard. 

I started off by tracing my pattern. My bust size calls for a size 6 but my waist calls for a size 8, so I blended the sizes and traced the waist darts for the size 8. I made a muslin for the bodice and sleeves, and determined the adjustments I needed to make: shorten the bodice by 7/8", and 1/2" to the side seams on both the front and back, and lengthen the waistband accordingly. The second muslin worked perfectly, so I went forward with those revisions. 

The pattern instructions initially surprised me in that they are so susinct, even with the illustrations. I like this because I habitually start skimming when there are walls of text, and that occasionally leads to mistakes. On the other hand, I've had experience making dresses so I don't need much hand-holding. A beginner would probably find the Sewholic instructions sparse and have lingering questions. For that reason, I'll say they are better suited for sewers with garment sewing experience, particularly with darts, invisible zippers, and finishing techniques. 

The lining ended up being no big deal. It came together without a hitch. The most time consuming part for me is always gathering, so that was standard. 

My finished dress fits wonderfully and is comfortable to boot. I love how the sleeves offer a natural range of movement without being sleeveless. And of course it has pockets! I'm definitely going to be making more Cambie Dresses in the future. 

World's Okayest Quilter T-shirts

Wednesday, December 9, 2015

After reading through Teresa Duryea Wong's book on Japanese quilts and quilters, I felt a bit...deflated. There are so many amazingly skilled quilters out there! I'm always amazing by how humble quilters are in spite of their abilities. That was the inspiration for a recent hand lettered illustration I created, World's Okayest Quilter.

I cleaned up the illustration a bit, digitized it, and have it ready to go off to my screen printer for some fun shirts!

Unlike with previous shirts in my shop, I'm going to be selling this shirt solely through pre-orders. Having extras on hand just hasn't worked out for me as well as I've hoped. So if you want a shirt, be sure to pre-order! You can get the full info on the shirts and pre-order over at my at my t-shirt shop.


Everyday Style Book Review + Blog Tour + Giveaway

Tuesday, December 8, 2015

About a month ago, the folks at Abram's Books and and Windham Fabrics reached out to me about participating in the blog hop for Lotta Jansdotter's new book, Everyday Style. I had flipped through the book at Quilt Market and even added it to my Amazon wishlist, so I jumped at the chance to participate.


Everyday Style is not your typical project-based book. The book consists of five "core" garment patterns (a skirt, jacket, pants, sleeveless top/dress, and a sleeved top/dress) that between two to five variations each as well as four simple bag patterns. Upon my initial flip-through, the structure was a little confusing, but everything clicks when you sit down and read it properly (something I'm not always good at). It reads more like a hybrid of Japanese sewing books like the Stylish Dress Book collection, a fashion magazine, and a series of journal entries. It's quite unique in that regard.

The first portion of the book is divided into four chapters by season. Each seasonal chapter features gobs of gorgeous photos of the garment patterns in fabrics and outfits befitting the season along with brief tutorials for accessories and embellishments (fabric jewelry, pom poms, wool cuffs, scarves, etc). If you're the type of person who likes to see different versions of patterns to get your creative gears turning, you'll adore this book. If you're more of a straight-to-the-point, no-frills type, Everyday Style might be a lot to wade through.

The second section of the book contains the actual instructions for sewing the garments and bags. Each pattern includes illustrated cutting diagrams, and all measurements are listed in both imperial and metric, so readers outside of the US will be happy campers. There are illustrations for the instructions, albeit small and somewhat sparse. For this reason, I'd say the patterns may not be for suitable for absolute beginners. I had no trouble understanding the instructions, but I've also had experience making garments. Instruction wise, the patterns are comparable to most of the Japanese sewing books I've read.


I made the Esme top using the spotted print from Lotta's Lucky collection. It was a super quick and simple project with the exception of attaching the set in sleeves. Like many patterns with set in sleeves, the instructions call for two lines of basting stitches to ease in the sleeve cap. This approach is a drastic over simplification of easing in a sleeve. It never works for me. The gathering approach always results in a puffy sleeve (which I hate) while the photographs clearly show a smooth sleeve. Instead of basting, I opted to pin the everloving crap out of of the sleeve cap, which results in less puff-age.

If you're looking for some basic sewing patterns and tons of photographic inspiration, Everyday Style will make a lovely addition to your library.

Blog Tour Schedule

Dec 1 – Lotta
Dec 2 – STC Craft
Dec 3 – Windham 
Dec 4 –  Noodlehead
Dec 7 – Modern Handcraft
Dec 8 – Sew Scatterbrained
Dec 9 – Crimson Tate
Dec 11 – Groovy Baby & Mama
Dec 15 – Craft Sanity
Dec 16 – Aesthetic Nest
Dec 17 – Sew Mama Sew
Dec 18 – Lish Dorset
Dec 19 – Fancy Tiger Crafts
Dec 21 – Generation Q
Dec 22 – Carolyn Friedlander
Dec 23 – Crafty Planner

Prize Giveaway!

The sponsors of the blog tour have a prize pack for one of my lucky readers. The winner will receive a copy of Everyday Style, a fat quarter of Lotta’s fabric from Windham, Lotta temporary tattoos, and Lotta washi tape.

To win, leave a comment with your email address by Saturday, December 12th at 9am CST. I'll pick one winner at random.

Extra Linkage

To learn more about Lotta and the contributors to Everyday Style, check out these links.

One Hour Top with Hit Parade Knits

Wednesday, November 11, 2015

I've been a long time sufferer of knit-phobia. I had a brief encounter with knit fabric in college, trying to make a tshirt for one of my BJDs. It kept getting sucked into my machine and stretching. I honestly had no clue what I was doing, but it instilled a sense of fear in me.


At Quilt Market, Julia wore a dress she made out of Lizzy House's Hit Parade Knits from Andover. It looked so comfy and cute, I was pretty jealous. After scoping at the knits at every major booth, Julia declared the Andover knits are her preference. They stretch two ways, and don't distort the colors' appearance when stretched. They're also very soft and an ideal weight for garments. 

I decided it was time to face my knit-phobia. Giuseppe sent me the cream kitty print and I selected an easy beginner project: the One Hour Top from Fancy Tiger Crafts. I don't have a serger so I spent some time researching how to tackle the task of sewing with knits. The main points I gathered were:
  • Prewash your fabric (always a good tip)
  • Take care not to stretch the fabric when transferring the pattern
  • Use a ballpoint needle
  • Use a stretch stitch, AKA, the lightning bolt
  • Use polyester thread (cotton doesn't stretch and will break)
  • Use a walking foot
  • Lower the pressed foot pressure to the lowest setting 
  • Don't stretch the fabric when sewing
After adding 2" to the hemline (I need something I traced my pattern onto the fabric with a water soluble marker and cut it out with my rotary cutter. This process took way longer than usual because I had to be careful not to stretch the fabric. Luckily the One Hour Top only has two pattern pieces.

I used a stretch stitch for all my seams and it worked wonderfully. I was pretty shocked that it worked so well right out of the gate.

The only issue I had was with the twin needle. I've never used a twin needle before. The pattern says to use a twin needle to hem the neckline, sleeves, and bottom hemline. I followed my machine's instructions to set up the twin needle tested on a scrap piece of knit. Based on the illustration in the pattern, it looked like they were doing a straight stitch, so that's what I selected. Well, it offered ZERO stretch. It didn't seem practical to have the neckline and sleeves not allow for any stretch, so I switched back to the stretch stitch to hem everything. I mentioned this to Lizzy House during our Meadow Quilt workshop and she informed me that there's actually a twin needle specifically for knits. Who knew?

The finished top is precious! I love loose 3/4 length tops, so this is right up my alley. I can't wait to sew more with knits.

Emma's Garden Blog Tour + Giveaway

Sunday, August 10, 2014


It’s August at last! After months of waiting, I finally get to share these exciting projects with the world! What makes them so exciting? They all use fabric from Emma’s Garden, the newest fabric collection of amazingly talented friend, Patty Sloniger!


My "Wing It" quilt and other Emma's Garden pretties

I need to start this post off by making a tearful virtual toast to Patty. I feel like the luckiest person in the world to have such amazing coworker and mentor! She’s the one who got me interested in fabric, which in turn made me start quilting. I owe her so much, which is why I wanted to make some extra special projects for her Spring Quilt Market booth and her blog tour! (Check out Patty's post for the blog tour full schedule!)


Taking my inspiration from Patty's butterfly print, I started sketching butterfly blocks, which grew into a baby quilt design. I had been quilting for only three months at the time, which is a testament to how simple it is to make! I named it "Wing It" because that's essentially what I was doing as I designed my very first quilt pattern.

You can download the FREE Wing It pattern here!

Want more? We're giving away a fat eighth bundle of the Emma's Garden prints I used to make this quilt! To enter, leave a comment on this post, and I'll select a random winner on Friday, Aug. 15th! Exciting!

From @michaelmillerfabrics via Instagram

After I finished the quilt, I had some tiny scraps left over. Being the person I am, I couldn't let them go unused. I opted to use them in this gorgeous cathedral window pillow. I used Jo Avery's pattern in issue 6 of Love Patchwork and Quilting as a guide, although I changed the sizes to suit my scrap assortment.

With Karri's lovely mini

Cathedral windows look way more complicated than they actually are, so even as a newbie, I was able to make a dramatic, posh pillow! I used the same variegated thread from my Wing It quilt to do some decorative hand stitching. I think it really takes everything to the next level. Even my overly-critical father loved it!

My pillow made it into Michael Miller's catalog!

Emma’s Garden also has great prints for clothing. I made this comfy summer blouse using her Big Blooms print, which may be my favorite design out of the whole collection. The pattern is from Yoshiko Tsukiori’s Sweet Dress Book. The construction was a breeze, taking me less than three hours from start to finish. I omitted the bow added ties to the sides which I think was a more grown-up touch.


Hopefully my projects have inspired you and done justice to Patty's beautiful collection! 

Stylish Dress Book: Dress T & F

Saturday, June 21, 2014

Yoshiko Tsukiori's Stylish Dress Book has been both a blessing and a curse. On the positive side, I haven't purchased any clothing since Patty loaned me the book about a month ago. The negative is that I can't stop making dresses! 


The third dress I made after dress Y and E was dress T, the style I had wanted to start with, but worried would be too difficult. Looks like I made a good call on that one! It was the most challenging of all the dresses I've made so far (the count is up to 6 right now, including two that I have yet to photograph).Turning the collar facing was fiddly, especially at the center point. I had the same problem with my crazy cat lady dress. The sleeves were frustrating, but I'll admit it was my fault. I have a hard time walking away from unfinished projects even when I'm mentally exhausted. It's like I can see the light at the end of the tunnel and I just can't stop! Thanks to my persistence, I sewed a sleeve to the bodice inside out, not once, but TWICE. Ugh. Learn from my fail and know when it's time to take a break!

As with my previous two dresses, I took in the side seams about an inch on either side. I also cut the skirt shorter than the pattern indicated. Since I'm only 5' tall, a typically short skirt goes a long way on my frame. In fact, a quick Google search shows that most people have worn dress E as top with pants or at least paired it with leggings. Without any alterations to the length, mine hits me right at the knee! Judging by the pattern, dress T was going to hit me mid-calf, which is not a flattering look for a short chick like me! 

Dress T was followed by dress F, a simple tunic top with open sleeves and ties. On a recent fabric shopping trip with Patty, I scored some lovely Domestic Bliss fabric by Liz Scott in the clearance bin. The bright and cheery colors seemed perfect for this relaxed dress. Sewing dress F was relaxing too...well...the bodice anyway. The sleeves were a chore. For some reason the instructions have you sew the top and bottom seams before hemming the open edge. It practice, it feels backwards and complicates the process. I made one sleeve as instructed and made the second one my way (bottom seam first, hem edge, sew top seam) which felt more natural. 
I didn't need to take in the side seams on this one because the style was less tent-like to begin with and I intended to wear it with a belt anyway. I need my waistline, thank you! As with all the dresses I've made from the Stylish Dress Book, dress F is divinely comfy. Ladies, be honest: being stylish is nice, but being stylish and comfy is heavenly! 


Costumes are Coming

Wednesday, June 18, 2014

Both my husband, Seth and I are huge Game of Thrones fans. Now that season four is all wrapped up, we feel the familiar emptiness of waiting for the next season to begin. This time however, we have a little something to look forward to that may help the time go by faster: Texas Renaissance Festival.


One of the benefits of living in Houston is being so close to the Texas Renaissance Festival every fall. We went twice last year, including our first time in costume. I was a mushroom, and Seth rented a costume. He couldn't decide what he wanted to be in time (and my sewing skills weren't that strong), and was a bit bummed to have to rent his outfit. We decided to get an early start next year so we could both go in cool costumes.

We were interested in going as characters from Game of Thrones, but daunted by the complexity of the costumes. Armor? Yikes! Jon Snow? Too hot for Texas! Thankfully Seth got a new favorite character this season with a much more manageable costume. As soon as Oberyn Martell was introduced, Seth's costume might as well have been written in stone. 

I went to Jo-Ann's last week during a good fabric sale and got lots of supplies. They even had this cool snake-skin material for $3.50/yd! I've started working on drafting the pattern for his robe, and so far it has been rather simple (except for getting Seth to put up with all the fittings). For the suns on his robe, I'm going to try to do the embroidered parts on my sewing machine and use the metal studs for the center.


I know which character I plan to be, but I'm keeping it a surprise until I actually start working on it. :) 

Stylish Dress Book - Dress E

Monday, May 26, 2014

After work on Friday, I stopped at Jo-Ann's to raid their clearance fabric section. I never buy more than a half yard of fabric unless I have a specific project, so I was not prepared for the urgent, unyielding desire to make more dresses from Yoshiko Tsukiori's Stylish Dress Book: Wear with Freedom. I made a good haul, getting lots of fabric for only $2.50/yard. I only regret not buying more.

Lots of clearance bin treasures!

I spent Saturday afternoon sewing up dress E, which turned out to be another fast and simple project. This was my first time doing tucks. I was delighted by how simple the process was. Just as long as it's not pleats...I hate sewing pleats. The only part of the construction I didn't like was having to attach the finished sleeves, but that's nothing new for me. I always hate sleeves. Dress Y spoiled me by sewing the side seams and sleeves in one motion. As with dress Y, I took in the side seams at the waist an inch on either side to avoid the circus tent look. 

I wore it grocery shopping with Seth on Sunday and the nice big pockets were perfect for my list and coupons. No more wrinkled up pieces of paper shoved in my butt pockets!
Modeling my new dress next to our family ent
I can see myself making more of this pattern in the future. Pinterest searches have led me to lots of cute remixes of dress E including ones with embellished details (Ivy Arch makes the best dressses!), sleeveless, and even shortened to a top. Contrasting pockets might also be cute with some kind of embellished collar. This dress is such a great blank slate to get creative with!

Stylish Dress Book - Dress Y

Sunday, May 25, 2014

My cat, Batman, deems this dress worthy of his gaze

Wearing my crazy cat lady dress to work recently must have signaled my newfound interest in sewing my own clothes, because a couple of weeks ago, Patty loaned me her copy of Yoshiko Tsukiori's Stylish Dress Book: Wear with Freedom. I've been enamoured with the breezey, casual Mori Girl look for a couple of years, and the tops and dresses in this book seemed perfect for that kind of look. Not to mention that loose-fitting clothing in the blazing Houston summers makes the heat a bit more bearable. 

I love almost all 26 of the pieces in this book, but dress Y and T were the ones that really captured my fancy. I opted to go for dress Y first since the contrasting collar looked simpler. The book includes patterns for sizes 6 to 16. I decided to go for a size 10 based on the bust measurement (waist measurements don't look like they factor in much to these loose-fitting garments) and figured I'd just take in any big areas. No muslin because I'm impatient! #yolo.


As soon as I unfolded the enclosed pattern pieces to start tracing, I froze up like a possum in fear. Lines overlapped lines in a mind-cramping mess! It turns out that all 26 patterns had to be crammed onto 3 double-sided sheets of paper, resulting in a wormhole of pattern pieces. Additionally, the pattern pieces for each dress are spread over multiple sheets instead of keeping them together. Trying to locate the correct pattern piece, extract/trace it with surgical precision, and add seam allowances after (they aren't included in the patterns) felt like playing some sick, twisted Highlights magazine game I never agreed to. 

Luckily, extracting the pattern was the hardest part of the process. The directions were simple and any confusion I had was remedied by the diagrams. Not having to worry about zippers, buttons, darts, or pleats simplifies things. I finished this dress in less than three hours!

For the main fabric, I used Pat Bravo's Millefiori print from her Bespoken collection. I used her Sequins print in amethyst from the same collection for the collar and trim. Both were on sale for $7.50/yd at Hawthorne Threads. If I had a do over, I would have gotten the Sequins print in turquoise because the two didn't contrast as much as I'd hoped. 

As anticipated, the fit was loose yet comfy. Being petite, I opted to take in the side seams an inch on either side at the waist to avoid looking like I was drowning. It's still a loose fit, just less tent-like. For future dresses, I think I will stick with size 10 and just take in seams as needed since it fit well everywhere else. 

I wore it to work on Tuesday and my coworkers thought it was really cute! It's also really comfortable to wear. I'm quite pleased with it, and I can't wait to make another dress from this book!

Crazy Cat Lady Dress

Sunday, May 4, 2014

Anyone who's been clothes shopping with me knows I have the fashion sense of a toddler. One of my college roommates used to joke that I'd only by clothes with animals on them. She wasn't far off the mark. I also have a (massive) fondness for Peter Pan collars. So when I saw Julia's amazingly precious Easter dress at the April HMQG meeting, I started foaming at the mouth. I promise it wasn't creepy.


Not only did I love the cut of the dress, it has pockets(!) and a Peter Pan collar! I knew I had to make one for myself. I purchased the pattern (Simplicity 1419) on Monday, but was still mulling over what fabric to use. For the past year or so, I've been oogling this cat dress on ModCloth, but at $90, I knew it probably was never going to make it into my closet. I figured this dress would be a good alternative if I could find a cute cat print fabric.

Lucky for me, Alyssa Thomas's new collection, Here Kitty Kitty, just dropped. And I mean JUST dropped. I had been checking Hawthorne Threads daily to see if it was available. No luck. On a whim, I checked Etsy and there was a seller with yardage available! By Thursday I had my gorgeous kitty fabric in my hot little hands!

I made a size 12, but now I'm wondering if I should have gone with a 10. Ironically, I planned on making a size 10, but my coworker Patty got bitten by the cuteness of Simplicity 1419 and made one as well. She made a size 12, which she let me try on. It was a near-perfect fit, so I decided to make the 12. I must have screwed up somewhere because my finished product was too big. Even after I disassembled the skirt and bodice, made adjustments, and reassembled it, it was still not an ideal fit. I ended up having to do some janky alterations to take in the side seams a bit. It turned out fine, but I will definitely have to make a muslin next time and work out the kinks.

Julia commented to me that the loop and button closure on the keyhole/collar were a pain to make, so I skipped it all together and just did a few hand stitches instead.

And now I have my crazy cat lady dress for under $50! In true toddler style, I'm wearing this baby to work on Monday. It's my equivalent of wearing something out of the store.
 
FREE BLOG TEMPLATE BY DESIGNER BLOGS