Showing posts with label quilting. Show all posts

2017 Recap

Thursday, January 4, 2018

I made my fabric design debut in 2016, but 2017 was the year things really started to kick in and feel real. Lots of changes, lots of projects (sewing and non-sewing), and never enough time/energy to do it all!

I keep a running list of all quilts I make (excluding mini quilts). I only count them when they are 100% complete, as in bound, and snuggle ready. Quilt tops don't count. I made 16 quilts during 2014, my first year as a quilter. 2015 saw 19 quilts, and in 2016 I made a crazy 25. In 2017, I only made 18. Just kidding, that's still a lot! 


Here's the list with Instagram, Craftsy, and/or blog links when available:
  1. Caturday Medallion (January) **Pattern Available Here**
  2. Fishbones (Jan/Feb) **Pattern Available Here**
  3. Kira Kira (Jan/Feb) (Love Patchwork & Quilting issue 52)
  4. Pretty Paws (Jan/Feb) **Pattern Available Here**
  5. Caturday Kittens Quilt (go to page 11) (Jan/Feb)
  6. Mandala (Feb)
  7. Modern Triangles Upstart (April)
  8. Luna Nova (June)
  9. Orbital (July) **Pattern Available Here**
  10. Granny Cat (August) (Quilty Box exclusive pattern)
  11. Diamond Back (Coming to Love Patchwork & Quilting in 2018) (August)
  12. Dizzy Dots (August) **Pattern Available Here**
  13. Whitecaps (October) **Pattern Available Here**
  14. Spooky Lanterns (October) **Pattern Available Here**
  15. Basketweaver (November) **Pattern Available Here**
  16. Maelstrom (November) (still need to photograph that one)
  17. Secret Kira Kira for another Windham desinger (November)
  18. Flowerbox (December) (Free pattern coming to Windham in 2018)
All but three quilts (#6, #7, and #8) were my own pattern designs as well. 

I also had a several publications in Love Patchwork & Quilting magazine, including 2 full covers and 1 smaller cover image.


Issue 52 - Kira Kira quilt
Issue 55 - Designer Profile


My second fabric collection, Caturday, showed at spring Quilt Market in St. Louis and hit stores in October.

Non-quilt things: I released a total of 16 enamel pins! Pins have been a big source of joy to me this past year, as I love supporting and collecting the work of other independent artists. They've also proved to be a fruitful part of my business. 


In addition to pins, I also stocked up my reopened Etsy shop with original stickers and art prints.

I did nearly a full year's worth of visual journal entries in an effort to force myself to draw every single day.

And certainly not least, we moved from Houston to Bryan, Tx. in September! After 3 years of living with my parents, Seth and I were deliriously happy to find our own place. 

All in all, wrapping up 2017 was probably the first time I've been able to look back at the year and see that I can do this. I can support myself by doing the things I love. I hope 2018 brings more of the same!

Caturday Blog Hop & Giveaway

Monday, October 16, 2017


Happy Caturday, friends! Pretty much every day is Caturday in our home with the two furbabies that inspired this collection, Batman & Chi.

A post shared by Felice Regina (@iamlunasol) on
Caturday initially started off as a sketchbook exercise in drawing cats. I was hesitant about designing a cat-themed collection because there is SO MUCH cat fabric in existence already. But during an afternoon of browsing cat fabric online, I realized I was seeing a lot of the same themes. Paw prints, yarn balls, and pretty much anything portraying cats as gentle, sweet princes and princesses. Meanwhile, Batman was trying to shove his butt in my face, Chi was trying to use the litter box while my husband was scooping it, and my mom was complaining about how she'd have to replace her clawed up couch when we moved out. I wondered, "do the people who made those prints even have cats? Because cats are assholes. Adorable and lovable, but still assholes." (Anyone remember this embroidery pattern? It's relevant.)


I designed Caturday to tell the true story about our feline friends. Litter Glitter depicts those awful pee clumps you scoop out of the litter box. Cat Scratch Fever is your ruined couch. Assterisk is...well...cat buttholes. (Here's a relevant comic I did back in college.)


One of my favorite parts of the range are the two border prints that I designed specifically for garments. The scale works for both adults and children's clothing. Check out this lovely dress by Lucy, @SmileandMake.


But of course, we can't forget the quilts! I have three new quilt patterns available to coordinate with Caturday: Pretty Paws, Caturday Medallion, and Fishbones. All are available as PDF downloads through my Craftsy shop, but Pretty Paws and Caturday Medallion are also being offered as paper patterns in quilt kits through local quilt shops. Be sure to ask your local shop if they plan on offering the kit!


A fourth pattern, Kira Kira, is available in issue 52 of Love Patchwork & Quilting magazine.


The collection has 24 prints in all and is in stores now! For more project inspiration, view the look book or check out #CaturdayFabric on Instagram (and tag your Caturday projects too!). If you need something small to get you started, give the Fat Cat Softie a try with my free tutorial.


GIVEAWAY!

To celebrate the launch of Caturday, I'm doing two giveaways for a fat quarter bundle of the collection. One here, and one on my Instagram. To enter this giveaway, simply leave a comment below! I'll pick a random winner on October 23rd. To enter my Instagram giveaway, check the post here.

Be sure to follow along with my friends for the rest of the Caturday blog hop!

Blog Hop Schedule 

October 16 - I Am Luna Sol (Me!)
October 17 - @iamlunasol Instagram Giveaway
October 18 - Kate Basti
October 19 - Modern Handcraft *Delayed until Oct. 20th*
October 20 - Gnome Angel
October 22 - Sew Sweetness Facebook Live stream @ 5pm CST


10 Tips for Stepping Up Your FMQ Game

Tuesday, July 18, 2017


1. Make a Pinterest board of quilting that inspires you.
Having something to aspire to motivates us to improve. Collect images of quilting that makes you say "WOW!" Don't worry if it looks too hard. I browse my quilting board frequently to get ideas and psych myself up.

2. Commit to investing more time on each project.
Good quilting takes time. I used to be dead set on getting quilting done in a day because I'm impatient. Now I take at least three or four days for FMQ. A few have taken nearly a week.

3. Experiment on a coloring sheet.
I like making a few photocopies of my quilt as a simple line drawing and start doodling on it with pencil. When I'm not being distracted by the colors and fabrics, it's easier to see the shapes I want to create with my quilting.

4. Test designs with template plastic and a dry erase marker.
I place a piece of clear template plastic over my quilt and draw on it with a fine point dry erase marker to get a rough idea of what a design will look like at 100% scale. Sometimes things look good on a small printout, but become impractical at actual size. Additionally, I practice drawing quilting motifs on a dry erase board. Practice makes perfect. If you draw a design over and over, the movements become instinctive.


5. Break it down.
Custom quilting isn't as hard as it looks. Everything can be broken down into easy, manageable steps. For my Orbital quilt, I approached the negative space with this process: Stitch the curved cross shape about 3/8" from the seams. Mark the second curve using a plastic template and chalk (see tip 8) and stitch it. Next, stitch 1/4" inside of that shape. Fill in the wide section with ribbon candy, curve by curve. Stitch the "ribs" in each quadrant of the center. Probably the hardest part of it all was keeping my ribbon candy even.


6. Don't baste until you have a plan.
I try to form at least a general idea of my quilting plan before I pin baste my quilt. Nothing is more annoying than pins sitting right in the middle of your path. If I have a plan, I can pin in places that I know will pose fewer interruptions.


7. For straight lines, look at your destination, not the needle.
Magic trick time. Get a piece of paper and try to draw a 6"-ish straight line without picking up your pen. It's probably not too straight. Now mark two dots about 6" apart. Starting with your pen on the first dot, look only at the second dot. Don't look anywhere but that dot. Now draw a line connecting the dots, never looking away from the destination dot. It's a lot straighter right?! Our brains are cool that way. If you look at the destination, your body is really good at getting you there. The same works for quilting.

8. Using marking helpers.
When starting out on a quilt, I usually need to mark some things until I get the hang of the quilting. I use a ruler and a hera to mark straight lines and tailor's chalk for curved lines. For dots, I use a Frixion pen. If there is a particular curve I'm going to have to quilt over and over, I'll make a template from cardstock or template plastic as a guide when marking with chalk. If I get comfortable after a while, I can set the training wheels aside, but there's nothing wrong with using them for the whole project.


9. Find your favorites.
Finding your favorite notions makes starting a project less intimidating. For me, I love Aurifil Monofilament, so I rarely have to worry about thread choices. I recently feel in love with Superior Threads topstitch needles (size 12) for FMQ at a friend's recommendation. My go-to batting is Quilter's Dream 80/20 blend or Dream Wool. I've also changed my mind on the Supreme Slider and come to appreciate the extra help it provides on large quilts.

10. Know when it's time for a break.
Classic "me" advice. When I get tired/bored/impatient, I make dumb choices. My work gets sloppy. Being able to tell myself, "just walk away NOW" has made the single biggest improvement in my FMQ work. Maybe the break will be an hour, or a few days. Either way, being impatient and frustrated will do nothing positive for your quilting.

Tula Nova Quilt & Tips for Machine Appliqueing EPP Giants

Monday, July 3, 2017


When I was picking thread colors to quilt projects for my new collection, Caturday, I discovered a happy accident. Lots of the thread colors from my Luna Sol Aurifil thread set were great matches for Caturday! When I dumped all the new rolls of fabric into my storage pin, it clicked. The two collections blend together almost seamlessly to create a bright and happy color spectrum! Awww yiss. 

I pre-ordered the Tula Nova EPP kit from Paper Pieces while at Quilt Market in St. Louis, and received it in early June, eager to get started. Time for a Luna Sol and Caturday mashup of legendary greatness! I spent some time studying the original quilt and mimicked the color placement in my coloring sheet, taking notes on which prints I planned to use. The ring of striped pentagons dug its claws in my brain and I had to replicate it. Thankfully, my buddy Rebecca Bryan's new collection Panache had four stripe prints that were perfect colors for this project. I had to improvise for the yellow stripe by piecing the fabric myself from Kona Buttercup and Yarrow. For the diamonds on the outermost pentagons, I used a selection of Windham Artisan cottons and a few other random Kona shades.


Once the whole thing was pieced, I had to figure out how to applique this giant onto the background. The pattern suggests basting it before appliqueing, but doesn't get more detailed than that. I put on my thinking cap and came up with a solution that worked insanely well. I've detailed my process below. Take note however, I thread basted all of pieces. If you're a glue baster, this approach won't work quite the same.

  1. Remove all the paper pieces except for those along the outermost edge. Press the entire EPP monster with a hot iron and spray starch until it is entirely flat and smooth. Give the outermost edges an extra press.
  2. Lay out background fabric and tape to the ground as if basting a quilt sandwich, making sure it's smooth and taut. Lay applique on top, position as desired, and smooth it out. Pin baste, starting at the center and working out radially. Do not basted the outermost edge because these pieces still have paper in them. Instead, pin as close to them as you can on the pieces without paper. Your outermost edge will be unbasted.
  3. Select a thread to match your applique (I used Aurifil monofilament on top) and set your machine to a blanket stitch.
  4. Remove the thread basting on a small section of the outermost edge and remove the paper pieces. I worked "block" (the star-in-pentagon units or fat star units) by block. With the papers removed from one block, pin the loose outer edge down with a straight pin or two. Begin stitching the applique down with the blanket stitch. When you reach any dog ears/seam allowances that stick out, simply fold them under the applique. I used my Purple Thang for this or a pair of tweezers for stubborn dog ears.
  5. Proceed around the entire piece, removing basting and papers from the next block just before you reach it, pinning it as needed, and stitching. 

For the quilting, I mimicked the original quilt for the most part, making some minor changes here and there. I'm pretty impressed with how well it came out, considering I do this on a domestic machine. I can't wait to hang this up on the wall whenever we move into our own place!

Name: Luna Nova
Size: 58" square
Fabric: Luna Sol, Caturday, Panache (stripes), and assorted solids
Pattern: Tula Nova
Quilting: Custom (Aurifil monofilament)
Completed: June 28, 2017

Caturday is set to ship to stores in October 2017. I haven't done a recap/introduction post for the collection yet because I plan to do that closer to release time, so stay tuned!

Modern Triangle Quilts Blog Tour

Thursday, April 6, 2017

If my blog name is any hint, I don't have the longest attention span. Anything repetitive is bound to bore me. One block quilts? Snooze. Give me a sampler though and I'm game! That's why I've been dying to get my hands on my dear friend Rebecca Bryan's second book, Modern Triangle Quilts.


In late 2015, when Becca was scrambling to make all of the quilts for the book, we decided to do a trade. I'd piece one of the Skylines quilt for her book, and she'd make a quilt for the Luna Sol Quilt Market booth in spring once all the triangle quilts were taken care of. I was a little skeptical when she sent me a box full of Kona solids, (I'm a print girl for life), but I had a blast sewing that quilt and I love the way it turned out. Leave it to Becca to choose the perfect color palette, am I right?
I had another fun "interaction" with the book when I did a pet portrait of Becca's pupper, Bruce Wayne, lounging on the Isosceles Sampler. 


Since getting my physical copy of the book earlier this week, I've already started on the Upstart quilt in a girly pink, peach, and red palette. I love pulling a pile of prints out of my stash and diving right in. Samplers are perfect for that.


Well Wishes Charity Quilt


Most recently, I contributed a block to a the Well Wishes charity quilt to benefit Living Water International. Even if I my block only took me 10 minutes, it feels cool to be a part of such a stunning project! (My block is the one touching the bound corner below.) And guess what? You have a chance to win the quilt!


Check out Becca's blog post for full contest details. To be entered to win the quilt we made, purchase the $5 Well Wishes quilt pattern via Becca's shop (100% of the proceeds of this pattern will go to Living Water International). Each purchase equals one entry. 

Book Giveaway

As part of the blog tour, C&T is giving away one copy of Modern Triangle Quilts to one of my readers. To win, just leave a comment on this post and I'll pick a random winner on Saturday April 15th at 10am CST. I'll contact the winner via email. 

(Note: Only addresses within the U.S. receive a hard copy of the book. Due to the extreme cost of international shipping, international winners receive the e-book version.)

Winner has been contacted!

Blog Tour Schedule

Don't forget to check out the rest of the blog tour for more chances to win this book!

Why I Love Aurifil Monofilament Thread

Friday, March 17, 2017

In the current age of social media "brand influencers," there's always some blogger talking about how much they "LoOoOoVeEe this amazing new product from Brand X" in their sponsored blog post filled with affiliate links to what is probably a not-so-life-changing product. Well, at the risk of sounding just as obnoxious, I REALLY HAVE TO TELL YOU ABOUT THIS PRODUCT I'VE BEEN USING THE CRAP OUT OF: Aurifil's monofilament thread.

Disclaimer: Aurifil did send me two free spools of the thread for this tutorial, but this was at my request after I months of using it, having purchased a cone with my own money. I mainly wanted to make sure that the spools didn't suffer from the issues I experienced with a different brand I'll mention later.

You may remember "Quilt Purgatory" from my Instagram late last summer. I had a stack of like...seven or eight quilt tops that I felt obligated to finish before I could move onto new projects. Faced with the task of rapid fire quilting so many quilts, I turned to invisible thread as an alternative to buying a ton of new thread colors to match all these quilt tops. I ended up falling in love with Aurifil's monofilament thread and I've used for every single quilt I've made since I discovered it.

What it is and how to use it:

image source: craftsy.com

It's a nylon "invisible" thread available in two colors: clear (for use on light fabrics) and smoke (for use on dark fabrics). Thread your machine with the monofilament, loosening the top tension slightly. For the bobbin, use a 50 weight cotton thread in a color that matches (or is close-ish to) your quilt top. You match the bobbin to the quilt top because sometimes the bobbin thread pulls up and becomes visible from the top as little dots, which you'll see below. But guess what this means? Wherever you'd normally be changing thread colors and rethreading your entire machine, all you have to do is switch out a bobbin color. Huge time saver!

The time saving aspect isn't the only benefit. Monofilament means I can get away with having a smaller selection of thread colors for applique and quilting. Example time!


Let's say I want to applique these Kona Gumdrop shapes onto a white background. I need a color to match my applique, but these are the only two pink thread colors I have. Poop, both are terrible matches. If you put a gun to my head, I guess I'd pick the lighter color, so let's give that a go with my preferred stitch, the blanket stitch.


No surprise here. It doesn't look great. BUT, what if I switch the top thread to the monofilament and leave that light pink in the bobbin? It looks way better! The bobbin thread still pokes up slightly, but becomes less obvious as I reduce the thread tension (on the top half of the circle) a little from my normal setting. Having the perfect thread match may be the best option, but I'd say this is pretty good without having to buy any more colors.


The other reason I like this thread for applique is that it hides your mistakes for you. Even if you're using a pretty close color for your applique, if you get off course, it will be painfully obvious. Not the case with monofilament!


As I said earlier there are two colors to choose from, clear and smoke. Smoke looks black on the spool, but it's a tricky chameleon. Personally, I have zero problem the way the clear shade looks on dark fabrics, but I will concede that smoke blends better. Unless you're a lot of super dark fabrics, I think you can get away using just the clear. If you want proof, look at this album of my Overwatch quilt, which I appliqued and quilted with only the clear monofilament and handful of bobbin colors.


Here's two test quilt sandwiches I made to show what the two colors look like on a dark charcoal fabric and white fabric. I think the clear thread on dark fabric looks worse in photos than it does in person.

So now that I've shown you that monofilament is awesome, why Aurifil specifically? Well, I actually started off trying the Coats & Clark monofilament. It looks almost exactly the same as Aurifil, but sewing with it makes me want to tear my hair out. It's unruly and tangles if you even look at it funny. It constantly would unspool prematurely and get tangled in my machine. It was seriously nightmare. Plus, it feels much stiffer, almost like a thin fishing line. Any untrimmed threads feel horribly pokey and scratchy. Ick. Coats & Clark is like a nasty feral cat to Aurifil's sweet and gentle lap cat.

So yeah, if you hate having to buy matching thread, this stuff is magic.

Satellite Medallion Fabric Key

Wednesday, October 26, 2016


Earlier this month, issue 40 of Love Patchwork & Quilting magazine went on sale in the UK with my Satellite Medallion on the cover! This is my first time being published in a magazine, so being on the cover of my favorite quilt mag is extra surreal. 

Someone on Instagram asked for a quick visual fabric key for the pattern (prints are listed as Fabrics A-N) and I'm happy to oblige for those who want to duplicate this quilt! I've added the corresponding letters to the swatch photo below. The only fabric not pictured is Fabric I, a coordinating Artisan Cotton (40171 Red-Royal) from Windham. I believe it's listed as "Blue Red" on Hawthrone Threads. It's a lovely cross-weave with an iridescent quality, so I highly suggest using it instead of substituting a traditional solid. 


Poison Apple Mini Quilt Tutorial

Saturday, October 15, 2016


I recently caved to my childish attraction to shiny Disney goodies and purchaed one of the Disney park exclusive poison apple mugs off eBay after seeing them in my Instagram feed. I realized that the classic Snow White icon would make a cool Halloween decoration in the form of a mini quilt, so I got to work. 

I traced a screenshot of the poison apple in Adobe Illustrator to make my templates, and picked a few Kona solids from my stash. I used Kona Lipstick, Meringue, and Chestnut for my applique, a black Artisan Cotton from Windham for the background, and a Cotton + Steel striped print for my binding.

To make this mini, download the templates and print them at 100%. Use the background template to cut out your background oval. Trace each of the applique templates onto the paper side of a paper-backed fusible web (I used Pellon Wonder Under), and fuse to the wrong side of your fabric. Cut out your templates, remove the paper, and fuse the pieces to your background. Stitch around the pieces to secure them (I do this in one step when quilting). Embroider along the dashed lines if desired. I used my FMQ foot and brown thread because I wasn't in the mood for hand embroidery. Make your quilt sandwich (I like to use two layers of batting for extra dimension), and quilt as desired. Make 42" of 2.5" wide bias binding and bind your mini. 

If you post your mini on Instagram, use the hashtag #PoisonAppleMiniQuilt so we can see your handiwork!

Celestial Bunnies Applique Pattern

Friday, September 23, 2016


I love machine applique for quick and cute representational projects. To make the moon bunny mini quilt you will need:
  • (1) 24" square for background
  • (4) 7.25" x 4.5" pieces for bunnies
  • (2) 6.5" squares for moon background and crescent
  • (8) 1.75" squares for sparkles
  • (12) 1" squares for circles
  • Paper-backed fusible web 
  • 26" square batting
  • 26" square backing
  • .25 yard for binding
  • Thread to match your appliques (I used my coordinating Aurifil collection)
  • Applique templates, printed at 100%
Trace the appropriate number of each template onto your paper-backed fusible web. You'll need (4) bunnies, (1) moon background, (1) moon crescent, (8) sparkles, and (4) of each size of circle. Fuse the web to the wrong side of your fabric and cut the pieces out.

Fold and press your 24" background square in half vertically, horizontally, and on both diagonals to create creases. Unfold. Position your applique pieces as shown in the photo, using the creases as a guide and fuse them to the background. Stitch around each piece with a blanket, applique, or zigzag stitch with matching thread. 

Now you can make your quilt sandwich and quilt your mini! Cut (3) 2.5" WOF strips from your binding fabric, sew end to end, and bind. 

Phased Quilt Tutorial


When I began designing the quilts for my fabric line, Luna Sol, I knew I had to have something reminiscent of moon phases. Cutting lots of curved templates can be slow though, and I anticipated a time crunch. What a perfect opportunity to put the Sizzix Fabi I won at Fall Quilt Market to work! I contacted the folks at Sizzix and they sent me the Drunkard's Path Quarter Circle and Arch dies.

This is my first project using the Sizzix Fabi and I wanted to kiss the thing afterwards for making it such a speedy process.

All seam allowances are ¼". Press seams open for best results.

Materials
  • ¼ yard 41880-2 Midnight
  • ¼ yard 41881-8 Eclipse
  • ¼ yard 41881-7 Twinkle
  • ¼ yard 41879-1 Interstellar
  • ¼ yard 41878-2 Midnight
  • ¼ yard 41878-1 Interstellar
  • ¼ yard 41882-2 Midnight
  • ¼ yard 40171-12 Blue-Orchid
  • 2⅞ yards 40171-20 Aqua-White
  • 3¾ yards backing
  • ½ yard binding

Cutting

  • From each of the ¼ yard cuts, cut (9) 8” x 4½”
    • Stack and cut using the quarter circle die. You will have (18) quarter circles per print for a total of (144).
  • From the Aqua, cut
    • (9) 6½” WOF strips and subcut (72) 6½” x 5”
      • Stack and cut using the arch die for a total of (144) pieces.
    • (1) 8½” WOF strip and subcut (36) 8½” x 1”
    • (3) 1½” WOF strips and subcut (6) 1½” x 17½”
    • (6) 5” WOF strips
      • From (1) strip, subcut (2) 5” x 10” and (3) 1½” x 17½”
  • Binding  - cut (6) 2½” WOF strips

Instructions

1. Finger press all quarter circle pieces in half to find the centers. Do the same for the arch pieces. Place (1) quarter circle and (1) arch right sides together (RST), matching up the centers and ends. Pin, sew, and press. Repeat until you have (144) drunkard's path blocks.

2. Divide the blocks into (18) groups of (8) blocks, made up of one block in each of the (8) quarter circle fabrics. 

3. Sew blocks together to make (4) semi-circle units per group and press. 

4. Sew (2) semi-circle units together to make a full circle block. Make (1) full circle block per group.
Sew a 8½” x 1” Aqua strip to the straight edge of each remaining semi-circle unit and press.

5. Sew the full circle block and the (2) semi-circle units together as illustrated and press. Repeat for all groups until you have (18) of these rectangular blocks.


6. The quilt is made up of (5) A and (4) B blocks. To make an A block, lay a rectangular block so that the full circle is on the left side. Position a 1½” x 17½” Aqua strip below. Place another rectangular block below the strip with the full circle on the right side. Sew these pieces together and press.


7. To make a B block, repeat the previous step, but rotate the rectangular blocks 180 degrees so that the full circle is on the right side for the top block and on the left for the bottom block.

8. Arrange the blocks as illustrated in the diagram. Rotate some blocks as indicated by the rotated letters on the diagram. Sew the blocks together to make (3) rows of (3) blocks each and press. Sew the rows together and press.


9. Sew the (5) 5" WOF strips together end-to-end and press. Subcut (2) 51½” border strips and sew them to the left and right sides of the quilt top. Press.

10. Cut (2) 60½” border strips and sew them to the top and bottom of the quilt top. Press.

Observations from FMQ Purgatory

Friday, August 19, 2016


For the past few weeks I've been in FMQ Purgatory, which is just a dramatic way to say that I'm trying to quilt my way through an out of control pile of quilt tops. Quilting 9 tops in 6 weeks (plus a few minis) has given me plenty of opportunities to make some helpful observations. Here are some of my findings:

1. Snipping some fingers off a pair of quilting gloves makes my life easier. I used to take my gloves off every time I had to change a bobbin, scratch my itchy eyes, or look up something on my iPad. I was watching the preview for Christina Cameli's "Wild Quilting" class on Craftsy when I noticed how she had modified her gloves. I decided to give it a try by cutting off the thumbs and index fingers on my gloves and I have no regrets! No more taking my gloves off and on.

2. Monofilament/invisible thread is super convenient. I purchased a cone of Aurifil's monofilament thread after successfully using the Coats and Clark invisible thread on my Heather Ross Scatterbrain Quilt. I highly recommend the Aurifil! I've used it on 4 quilts so far with awesome results. I still try to use a bobbin thread that matches the section of quilt top I'm working on, but I have less pressure to find the perfect matching thread this way. Normally I have no qualms about ordering matching thread, but when you have a stack of quilts to get through, it's nice to have one less thing to worry about. For tips on quilting with invisible thread, I suggest reading this article.

3. The Supreme Slider isn't a game changer for me. The Supreme Slider is supposed to reduce drag and help you move your quilt more easily as you quilt. I guess the extension table for my Juki is already pretty slick because I have not felt much difference while using it to merit the $34 retail price. In fact, the other day, I lifted up my quilt to change a bobbin only to realize I had forgotten to put the back Slider on my machine. I had been FMQing for 30 minutes and hadn't even noticed! I think the reason is simple: the drag isn't because of the machine surface only...it's because you're trying to move several pounds of giant quilt with your fingertips. Obviously there will be some drag no matter what.

4. Testing quilt designs using clear template plastic and dry erase marker is brilliant. I used to audition quilt designs by doodling on a sketch of my quilt, but placing the template plastic on your quilt allows you to get a feel for the true scale and execution.

5. Worry about how to quilt one section at a time. Trying to map out every detail gets overwhelming and makes me more likely to procrastinate. Instead, I just focus on the task at hand, be it one block, a border, or the center of a medallion. When that part is done, I can choose how to proceed based on what designs compliment the work I just finished. It helps reduce the pressure to find the absolute perfect combination of designs.

Pokemon Starter Mini Quilt Tutorial

Thursday, July 28, 2016


I post my impromptu Pokemon starter mini quilt yesterday on Instagram and today I'm sharing a tutorial so you can make your own!

You will need:

  • (33) 2.75" low volume squares
  • Scraps of fabric for your applique pieces 
  • Paper backed fusible web (I use Pellon Wonder Under)
  • Invisible thread or thread to match your applique
  • 28" x 9" backing and batting
  • Binding, about 50"
  • Pokemon Applique Templates PDF (download here)

Start by piecing your low volume squares into (3) rows of (11) squares each, then sew those rows together to make a 25.25" x 7.25" background.

Trace the template components onto the fusible web, fuse to the wrong side of your fabric, and cut out with scissors. Now start fusing your pieces to the background, starting with the bottom layers, working up to the top. Normally you'd stitch around each piece using a blanket or applique stitch to secure it, but since I'm just hanging mine on the wall where it won't be handled, I skipped this step.


Once all your pieces are fused, baste your quilt sandwich and quilt away! I did straight lines in my background with white thread, then switch to transparent thread to quilt around some of the details in my Pokemon to give them more dimension (like around Pikachu's cheeks, Bulbasaur's mouth, etc). After that, all that's left is to bind it off and hang it up!

4 Things Quilters Need to Do More Often

Wednesday, July 20, 2016

Clean the lint out of your machine

People don't realize how much the build up of lint can affect their stitch quality. Hint: it's a lot. My bobbin will actually start to make a distinct rattling noise once it's passed a lint threshold, so I'm always mindful. If you have a drop in bobbin, it's important to lift out the entire bobbin case and dust under there as well. Just remember not to use a can of air unless you have an open path for that dust to exit the machine. Otherwise you're just blowing the mess further inside.

Give your cutting mat a spa day

Cutting mats take a lot of abuse and don't get nearly enough love. You can extend the life of your cutting mat by keeping it hydrated. Yes, hydrated. Once a week (or sooner if it seems dusty), I spray my mat with a water from a squirt bottle and wipe it down. Every couple months or so, I'll put it in my bathtub and fill it with enough warm water to cover it. I soak it for 10 minutes before rubbing it down with a washcloth to work out any fiber bits that have gotten stuck in the cuts on the mat.


Stretch those muscles

I always feel silly when I tell people how I'm experiencing muscle pain in my upper back and shoulders from binding a quilt or doing EPP. At a recent checkup, my doctor made me feel a little better about it. She told me that any kind of repetitive movement, even small movements like hand stitching, are likely to cause pain over time. She showed me some upper back stretches to do every half hour or so when doing handwork and it's helped immensely! Doing stretches for quilting may sound dorky, but it's better than an aching body.

Wear sunscreen

Just because you're sitting inside doesn't mean you're immune to sun damage. Chances are you have some kind of natural light in your sewing area, and that means you're being exposed to UV rays. Even compact fluorescent light bulbs can emit UV radiation (which is one of the reasons I use LED bulbs). Sun damage is the number one cause of skin aging. If you don't believe me, just look at this photo of a professional truck driver. I wear sunscreen on my face every single day. And no, the SPF in your makeup is not enough. You should be applying 1/4 teaspoon of sunscreen to your face. As a personal note, I've found that Korean and Japanese sunscreens both feel and perform better than heavy, greasy American brands that leave you looking like Casper. I personally love Tonymoly's Mango SPF50+ PA+++.


Why I Switched Back to Thread Basting for EPP

Monday, June 20, 2016


In the past, I've been a big proponent of glue basting for English Paper Piecing (EPP). But, surprise! I've switched to team thread basting. Scandalous, I know.

At Quilt Market, I had the pleasure of meeting Jill Shaulis and Vicki Olsen of Yellow Creek Quilt Designs, my neighbors in the Windham Fabrics booth. They were stitching up their own pattern, Stars in the Garden, I was drawn in by the tiny 1/2" hexies. After some chatting, she converted me. I'm happily thread basting my current EPP project and here's why I now prefer it to glue basting:

1. Glue basting doesn't really save time. 
The main I and most people who were/are glue basters ditched the thread is because glue basting is supposedly faster. Just a few swipes with a glue stick will do the job faster than threading a needle, knotting your thread and basting, right? If you're slow on the draw with your needle, maybe so. However, even if glue basting saves you time on the prep work, you will end up paying it back when it comes time to remove your papers. Having done a number of glue basted EPP projects, I can attest that peeling the paper away from the fabric takes some time. With thread basting, a seam ripper or pair of thread snips will make quick work of your basting and release your papers without a struggle.

2. Glue basting gets sticky.
The Elmer's glue sticks I formerly used for basting have a fairly wide diameter (about 3/4"), meaning a flat swipe covers applies more glue than I need for a 1/4" - 3/8" seam allowance. The result is exposed, sticky paper. I would sometimes compensate by applying the glue at an angle, similar to a lipstick bullet, but this would cause my glue stick to start getting deformed. Either way, I had sticky fingers within a few minutes. I imagine this is what a child's hands feel like. I swear, tiny children are always sticky. I think they secrete grape jelly from their skin like amphibians. Anyway, I hate being sticky. Thread is not sticky. Problem solved.

3. Glue basting shortens the life of your EPP papers.
Even with the baby-strength purple Elmer's glue sticks, a glue stick is still a glue stick. When the time comes to remove my papers, I count myself lucky if I can remove my glue basted papers without outright ripping them. At best I can reuse them 2 or 3 times before they become a sticky mess or fall apart. With thread basting, I can get many more uses out of the papers as the needle holes take a lot longer to accumulate to a point where the papers stop being useful. Less paper waste is better in my book.

4. Thread trash is better than plastic trash.
I like to do what I can to be environmentally friendly when possible, and I've started feeling really guilty about generating unnecessary plastic trash. While the Elmer's glue sticks are cheap and last longer than the F&P refillable glue "pen", they get used up surprisingly fast. I was going through 6 packs of glue sticks on a regular basis, and each empty plastic tube made me feel bad. Tossing a small handful of cotton thread snippets in the trash is obviously a greener option.

5. No more hunting for hiding papers.
Once your project is all stitched up, a glue basted piece looks the same a piece that's had the paper removed when viewed from the right side. I used to find myself hunting for (and finding) hiding papers after I thought I had removed them all. With thread basting, there is no doubt where those papers are still hanging out.

6. Thread basting is easier for travel.
I like taking EPP to guild meetings or appointments that require me to sit in a waiting room. The problem is that glue basting requires a work surface unless you want some extra sticky fingers. Meanwhile, I can thread baste easily without a table, so I don't have to worry about prepping pieces in advance.


Spring 2016 Quilt Market Recap: The Luna Sol Booth

Tuesday, May 31, 2016

Now that I've had a week to refresh after Quilt Market, it's time to talk about my fabric collection, Luna Sol, and all the awesome samples that I had on display!


Luna Sol draws its inspiration from many aspects of my life and personality, but the tl;dr version is the moon bunny. The moon bunny originates from Eastern folklore, and that is how I first heard about the concept as a child. During college, the idea of the moon bunny just stuck with me for some reason, but I wasn't thinking of it in the original context anymore. The character started morphing into something I used as a personal identifier. I refer to it as my "spirit animal" sometimes for simplicity because it's a confluence of so many ideas. It embodies themes of cycles, introversion, introspection, the nature of creativity. I think watching Watership Down for the first time helped cement all of those things together in my mind. The image of the ghostly Black Rabbit of InlĂ© and the song "Bright Eyes" by Art Garfunkel had an inexplicable impact on me. 

I'm sure most of you have heard the idea about how highly creative people tend to have turbulent emotional lives. I for one, totally relate to this short comic. Back at 2015 Quilt Con, even Heather Ross admitted she can't get through the process of designing a collection without crying at least once. I've dealt with depression since I was was eleven, and I honestly think it's the reason I became such an aggressive maker and illustrator. Somewhere along the way, I stopped thinking of the episodes as an affliction. Now, instead of being knocked on my ass when a wave hits, I've learned to ride it and let it fuel my internal exploration. When I feel empty and aimless, it drives me to find what is important to me. At the very least, making a stack of quilts and filling a sketchbook gives me a feeling of accomplishment to offset the lows. I guess you could say the moon bunny is the cuddly face of this cyclical life. He does his thing on the moon in low times and then blasts off like a comet when the tide comes in. 

The name Luna Sol, embodies this cycle as well. Night to day, totally natural. It's just the way I live, and the result is bright and colorful! With all that said, let's talk about the samples! Many of my samples can be seen in my look book with relevant details (dimensions, pattern availability, etc.), so if I don't mention the nitty gritty, check there. Samples marked with a * will be free patterns. Releases will be closer to September when Luna Sol ships to stores! All samples were made by yours truly unless stated otherwise. Yay for HMQG buddies!

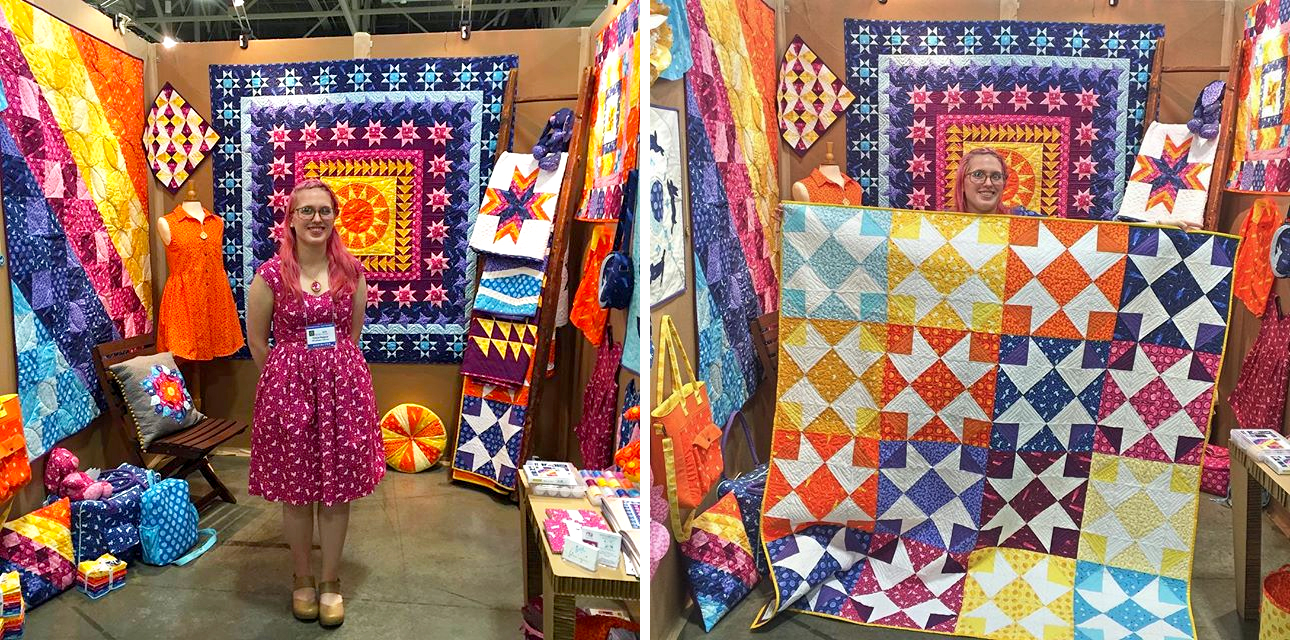
 Let's start with the left wall! We'll go clockwise from the top. The blue Mia & Moi dress was made by my friend and fellow designer, Patty Sloniger, who started me on this fabric design adventure. Next is the Northern Lights* quilt which was pieced by Cheryl Watson and designed/quilted by me. Then we have a sunny Collegiate Tote. The bunny dress pattern was a surprise find during a Hobby Lobby run, so even though I schemed to outsource all the children's garment sewing to friends with kids, I found myself making a 4T dress. Go figure. We also have my billionth cathedral window pillow cover, sans pillow. At the center is a mini quilt that was actually one of the first quilt patterns I came up with for Luna Sol.


On the floor below sat a pillow version of Northern Lights*, one of three Easter Bunny Buddies made by Liz Pawlik, the Guild Duffel (a new pattern of mine coming later this summer), and the Matsuri Bag.


Here you can see a better view of the Northern Lights quilt*, a kaleidoscope mini by Stephanie Freeman, and the centerpiece, the Satellite Medallion! This quilt pattern is featured on the cover of the look book and will be featured in an upcoming issue of Love Patchwork & Quilting magazine. I made my first Alder Shirtdress too, but it stayed on the mannequin because it ended up not being very flattering on me. Giuseppe Ribaudo (AKA @giucy_giuce) made an awesome EPP pillow complete with pom poms (tutorial here)! Julia Eigenbrodt also made a pillow featuring a leaping bunny with her FPP wizardry. She also supplied several of her adorable 3D printed embroidery hoop necklaces that we sprinkled around the booth. 

On the right wall we hung up my Phased quilt* which I made using the Drunkard's Path dies from Sizzix. The round Moon Bunny bag* hanging beside it features an applique version of the logo from my selvedge. Below that, you can see the Sweet and Sassy dress made by Katie Christman that her daughter preciously modeled in the look book. Heidi Staples made the Planetary Mini Medallion* which will be part of my blog hop closer to the release date. Hilary Jordan made the Sketchbook Shirt for her son William, who dubbed it his "fireball bunny shirt." Karri Garza also got in on the kid's sewing with a Geranium Dress!

I made a patchwork lined drawstring bag at the last minute, which hung out next to the Crimson & Clover Train Case also made by Stephanie Freeman. There were four more large quilts that we didn't have room for on the walls. From top to bottom: Feathered Stars by Rebecca Bryan, The New Wave Quilt, Sunset Star* which was pieced by Debbie Grosskopf, and Night Bunnies* by Stephanie Kendron. You can see all of those (minus the New Wave) in the look book. Lastly we have the Sprocket Pillow that you can see better in the panorama towards the top of the post.


We displayed the look books, fabric, another Easter Bunny Buddy, and my Aurifil thread collection on the cardboard table. If you haven't seen the gorgeous thread colors to coordinate with Luna Sol, you can check out the post and interview on Aurifil's blog. All of the large quilts (minus Night Bunnies and Feathered Stars) were quilted using these threads, and they were heavenly to have. It's such a relief to have the perfect colors already at your disposal.


I hope you enjoyed all the pretty Luna Sol projects! You can check out the #LunaSolFabric hashtag on Instagram to see more and keep up with what we're making with it.
 
FREE BLOG TEMPLATE BY DESIGNER BLOGS